

Sidebar Widgets
Show data from your connectors inside TextPeak Inbox conversations. Learn how to generate a sidebar widget with AI, publish it, and choose which teams see it.
A sidebar widget shows data from one of your data connectors inside a conversation: an order history, a payment summary, a usage chart, or a customer's plan. You describe the view you want in a chat, and TextPeak generates it with AI. Agents then see the widget in the conversation's Details panel, next to the contact's data.
This article walks you through generating a widget, publishing it, and choosing which conversations show it.
NOTEA widget needs a published data connector. Create the connector first; see the Data Connectors page. Only Inbox admins and Inbox managers can open the Inbox Settings page, where widgets are created and managed.
To open the Sidebar Widgets page:
Log in to TextPeak
In your browser, log in to TextPeak with manager access privileges.
Open Inbox
In the main TextPeak menu, select the Inbox tab.
Open Settings
Click Settings at the bottom of the Inbox sidebar.
Open Sidebar Widgets
In the Automation group, click Sidebar Widgets.
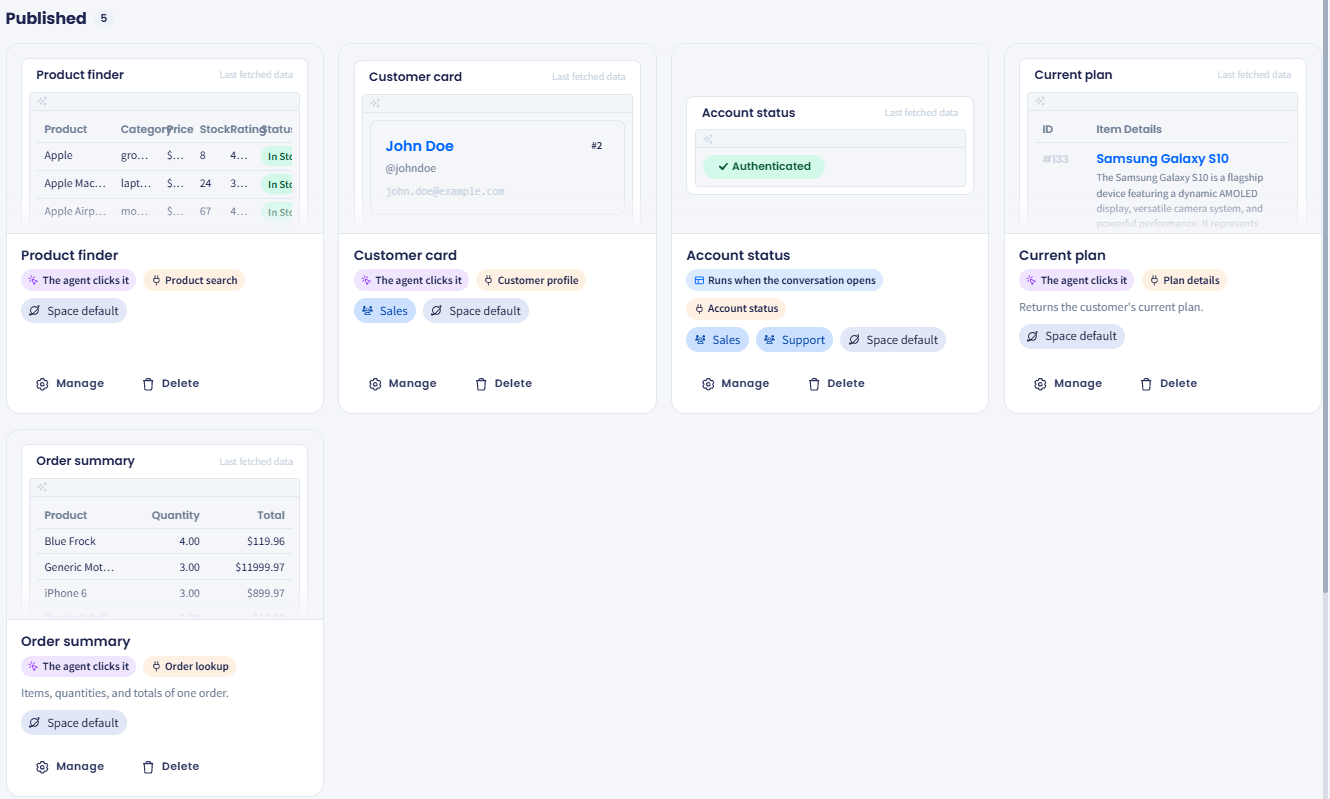
The Sidebar Widgets page
Widgets are grouped into Published and Not published. Each card previews the widget with its last fetched data and shows when it runs, which connector feeds it, and which teams show it: a team name, Space default, or Not used by any team. Use Manage to open a widget and Delete to remove it.
Creating a widget
A new widget goes through two steps: Details and Generate widget.
Choosing the connector and when it runs
Start a new widget
On the Sidebar Widgets page, click New widget.
Select the connector
In Connector, select the connector that feeds the widget. Only published connectors appear.
Choose when it runs
Under When it runs, select Runs when the conversation opens or The agent clicks it.
Name the widget
In Name, enter a short name. Agents read it at the top of the widget. Optionally, enter a Description.
Set what the agent is asked for
If the connector has values the agent fills in, they are listed under What the agent is asked for. For each one, enter the label the agent sees in Ask the agent for, such as Order number, or turn on Or pre-fill it and enter a fixed value instead.
Continue
Click Next.
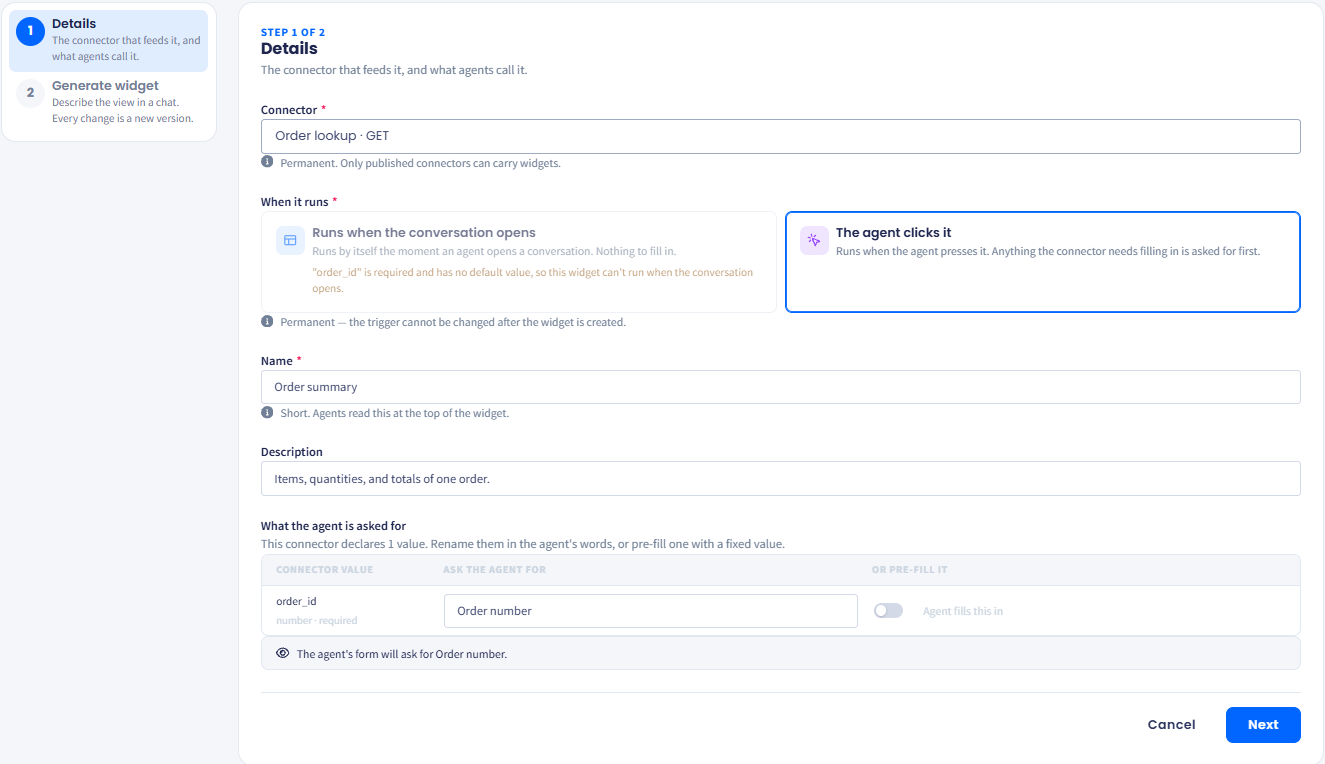
Step 1 of 2: Details
WARNINGYou cannot change a widget's connector or when it runs after you create it. To change either, create a new widget.
| When it runs | What the agent sees |
|---|---|
| Runs when the conversation opens | The widget loads its data as soon as the agent opens the conversation. There is nothing to fill in. |
| The agent clicks it | The widget waits until the agent clicks it, and asks for any value the connector needs first. |
A connector with a required value that has no pre-filled value can only feed a widget that runs when the agent clicks it.
Generating the view with AI
Describe the view
In the Widget generator chat, describe what the widget should show, for example Show the orders in a table with the total and the status. Press Enter to send.
Check the preview
The new version appears in the chat. Click Show in preview to see it with the connector's last fetched data. A widget that runs when the agent clicks it shows no data in the preview until it has run at least once.
Ask for changes
To change the layout, the colors, or what the widget shows, describe the change in the chat. Every change becomes a new version, and earlier versions remain in the chat, so you can go back to any of them.
Publish the widget
With the version you want in the preview, click Finish. Finishing publishes the version you are previewing to agents.
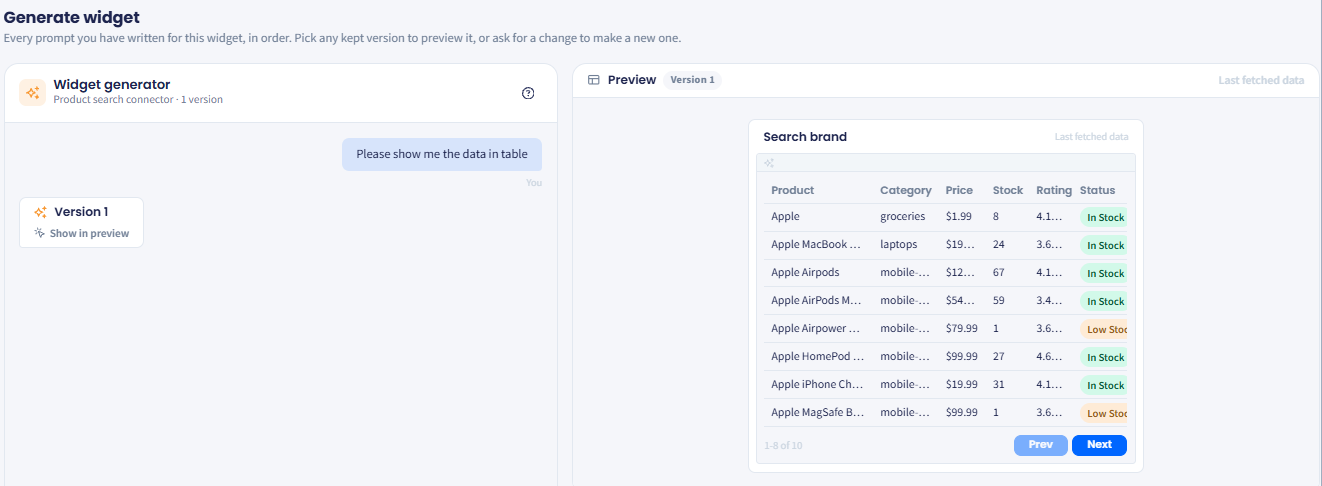
Generating a widget, with the preview on the right
Below the preview, Fields this widget is given lists the fields the widget can use. These are the fields you saved on the connector, never the raw response from your API. To give a widget more fields, add them to the connector; see Testing the connector and choosing fields.
TIPDescribe the job the agent is doing rather than the fields. Show the last three orders, newest first, with a red status when payment failed gives the generator more to work with than a list of field names.
Choosing which conversations show widgets
Agents see widgets in the Sidebar widgets section of a conversation's Details panel. Which widgets appear depends on the team the conversation belongs to:
- Space default: the list you set in General Settings. It applies to conversations with no team, and to teams that have no list of their own.
- Team list: a list you set on a team's Widgets tab. It replaces the space default for that team's conversations.
- No list at all: when no default list is set, conversations show every published widget.
Setting the space default
Open General Settings
In Inbox Settings, in the Workspace group, click General Settings.
Add the widgets
Under Default widgets, click Add widget and select the widgets to show. Use Search widgets to find one in a long list.
Check the list
What those conversations show today lists the widgets in the order agents see them.
Save the list
Click Save default widgets.
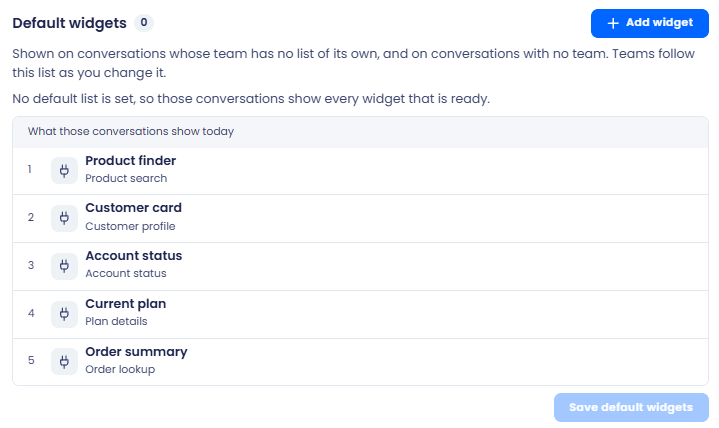
Default widgets in General Settings
Teams that follow the space default pick up your changes to this list.
Giving a team its own widgets
Open Teams
In Inbox Settings, in the Workspace group, click Teams.
Open the Widgets tab
Select the team, then open the Widgets tab.
Add the widgets
Click Add widget and select the widgets the team should see, using Search widgets to find one. What agents see on this team's conversations today lists them in the order agents see them.
Save the list
Click Save widgets.
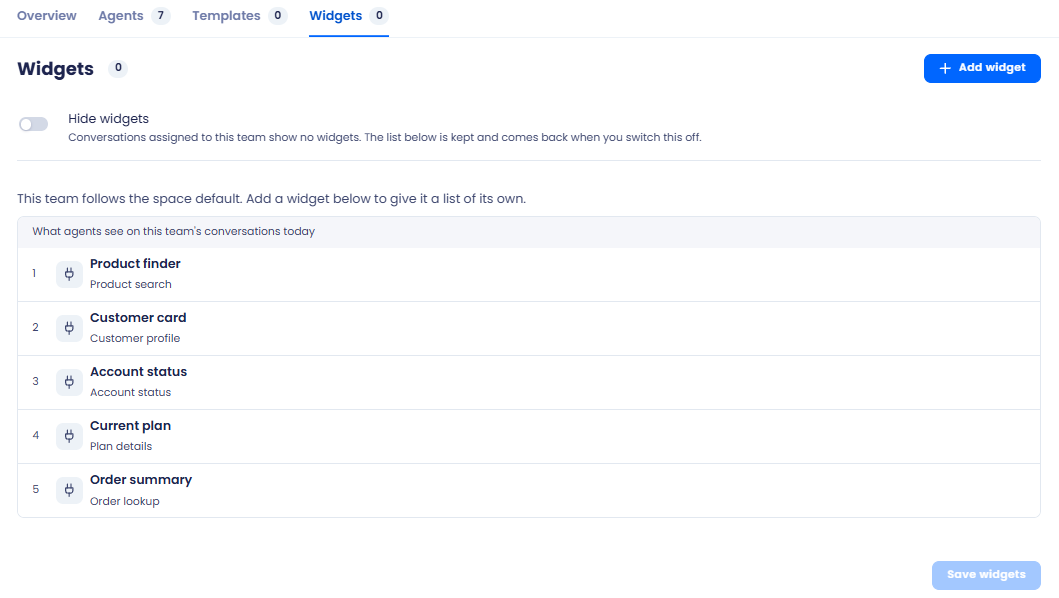
A team's Widgets tab
To show no widgets on a team's conversations, turn on Hide widgets. TextPeak saves the team's list and brings it back when you turn the option off.
Using a widget in a conversation
Open the conversation
Open the conversation and click the Details button at the top right of the conversation timeline.
Find the widgets
Expand the Sidebar widgets section.
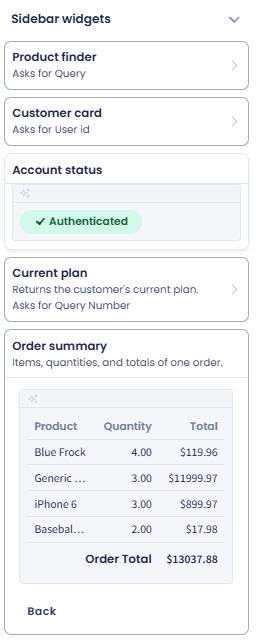
The Sidebar widgets section of the Details panel
Run a widget
A widget that runs when the conversation opens shows its data straight away. For a widget that runs when you click it, click it, enter any value it asks for, such as the order number, and click Run it.
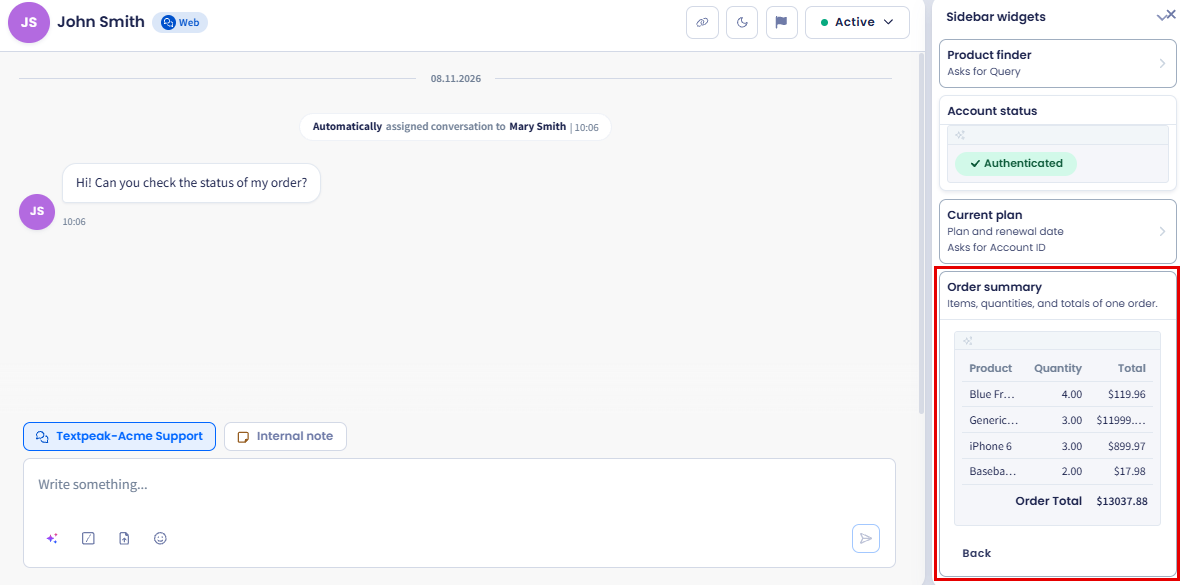
A widget showing its data next to the conversation
To return a widget to its input, click Back. For the rest of the Details panel, see the Agent's Guide: Managing Conversations page.
Changing or removing a widget
On the Sidebar Widgets page, click Manage on the widget. From its page you can:
- Click Edit to change the name or the description.
- Generate a new version in the chat and publish it with Publish to agents. Agents see the published version only.
- Turn off Visible to agents to hide the widget from every conversation without deleting it.
- Click Delete to remove the widget.
For the rest of the manager options, see the Manager's Guide: Inbox Settings page.
Updated about 11 hours ago