

Logging In With External Identity Providers
Follow the detailed instructions for providing Microsoft or Google OAuth login options to your CommPeak Cloud PBX users and for signing in with SSO SAML.
In addition to the username/password sign-in, several other login options are available in CommPeak Dialer and Cloud PBX. You can choose the best methods for meeting your needs. All options provide secure ways for verifying the user's identity.
- Login with GoogleOAuth
- Login with MicrosoftOAuth
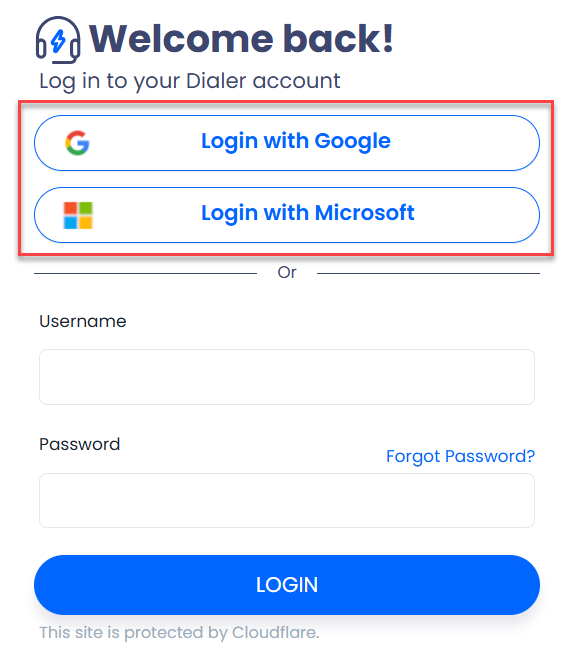
Login page with Google and Microsoft sign-in options highlighted
Both options above follow the OAuth 2.0 standard for secure authorization, enabling delegated access by issuing access tokens to third-party services without exposing user credentials. However, OAuth is solely for authorization — not authentication.
The OpenID Connect (OIDC) authentication layer is built on top of OAuth 2.0. Identity providers use OIDC so users can first sign in with their Identity Provider (IdP) and then access applications without having to log in and share credentials.
OAuth lacks encryption and relies on secure socket layer and transport layer security protocols (SSL/TLS), making it generally not a good choice for securing an enterprise with hundreds or thousands of employees.
- Login with SSO SAML only
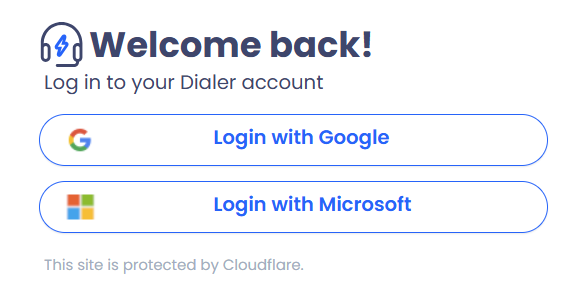
The login page with SSO sign-in only will not show the username credentials option
The CommPeak Dialer and Cloud PBX, supports Single Sign-On (SSO)-only mode, allowing users to log in without entering a username or password. For details on enabling SSO-only login, click here.
IMPORTANTEnsure SSO is working properly before enabling it as the sole login method. If SSO fails, the user may be locked out and need to contact support for assistance.
Undestanding SAML benefitsManaging passwords for applications used by hundreds or even thousands of employees can be extremely challenging. Security Assertion Markup Language (SAML) offers enterprises a single sign-on protocol.
SAML is a protocol that lets an IdP transmit a user's credentials to a service provider to both authenticate and authorize that user to access a service. SAML simplifies password management and enables SSO. It is helpful for enterprises because employees have access to more applications to carry out their jobs.
When a user requests access to the Dialer or Cloud PBX, it redirects the user to an IdP for authentication, which could be a service like GSuite or Okta. The IdP then verifies the user's identity, typically through methods like passwords or biometrics, and generates a SAML assertion response containing the user's authenticated identity. This SAML assertion response is sent back to the Dialer or Cloud PBX, which grants the user access based on the identity information provided in the response.
How to turn on Google OAuth
To turn on the login with Google OAuth for your users:
-
Go to Settings > General Settings.
-
Scroll down to the Login Configuration section.
-
Toggle the slider to the right to enable the relevant option.
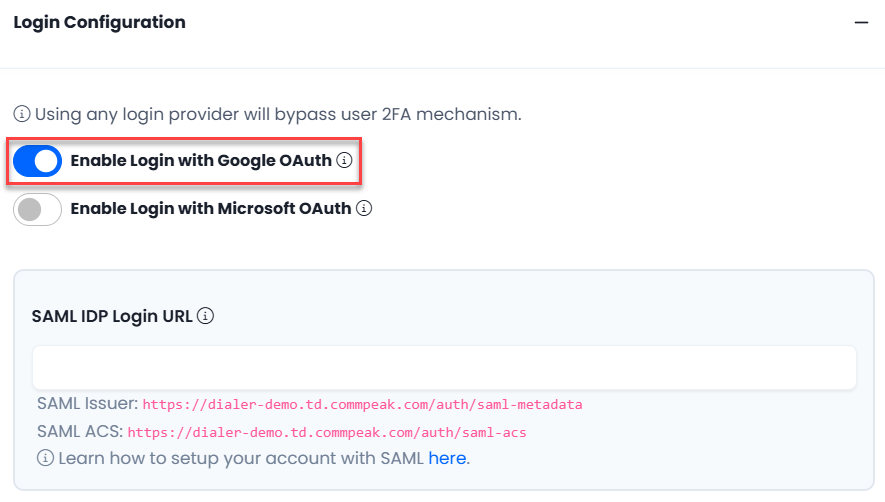
Login Configuration with Google OAuth option highlighted
NOTEPlease take into account the following information:
- This login option is available to all users with a Google email account.
- When a user logs in with Google and authorizes their Google email, the Dialer or Cloud PBX system searches for this email address in its database. The login is then associated with the first user account that matches the authorized Google email.
- If the system contains the same email address for more than one user, the login will be assigned to the first active user with that email.
- Sign-in from a standalone CommPeak Softphone doesn't support the Google login.
- This login feature bypasses both the login with email one-time code and two-factor authentication processes.
How to turn on Microsoft OAuth
To turn on the login with Microsoft OAuth for your users:
-
Go to Settings > General Settings.
-
Scroll down to the Login Configuration section.
-
Toggle the slider to the right to enable the relevant option.
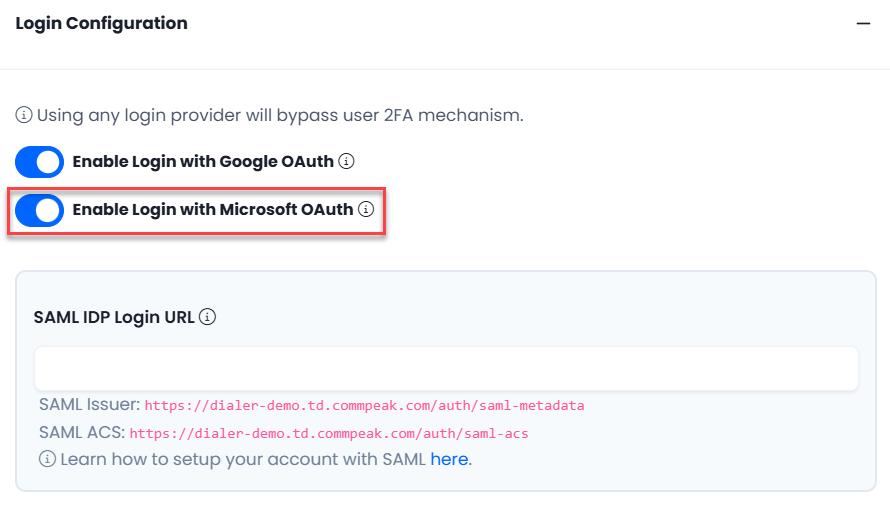
Login Configuration with Microsoft OAuth option highlighted
NOTEPlease take into account the following information.
- This login is available to any user utilizing Microsoft or Azure Email services, including Microsoft 365, and Live accounts.
- When a user logs in with Microsoft after authorizing their Microsoft email, the system searches for this email in the Dialer or Cloud PBX. The login is then assigned to the first user associated with the authorized Microsoft email.
- If the system contains the same email address for more than one user, the login will be assigned to the first active user with that email.
- This login option bypasses both the login with email one-time code and two-factor authentication processes.
How to integrate with a SAML provider
To integrate:
-
Go to Settings > General Settings.
-
Scroll down to the Login Configuration section.
-
Enable the account login with SSO SAML by inserting SAML Login URL, which must be obtained from your IdP. The Issuer URL and ACS URL are shown below the login URL.
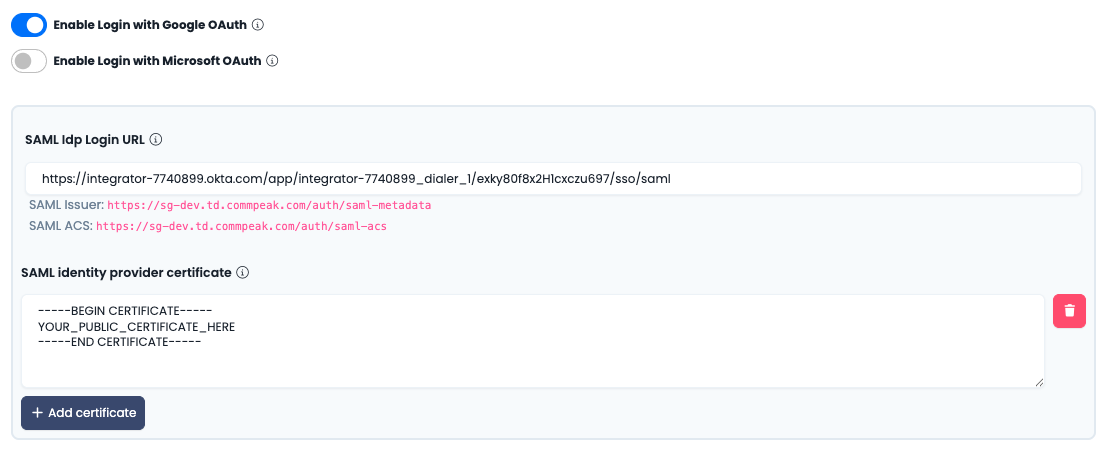
Login Configuration with SAML URL highlighted
NOTEPlease take into account the following information:
- SAML login lets you easily manage which users within your organization can access the Dialer or Cloud PBX. Users do not need to enter passwords; they simply click Login via SSO and authenticate through the customer's SAML IdP.
- Sign-in from the standalone CommPeak Softphone doesn't support the Login with SSO option.
- The system processes the email authorized by the customer’s SAML provider and logs in with the same active user email in the system. Deleted or inactive users cannot log in using SAML.
- This login option bypasses both the login with email one-time code and two-factor authentication processes.
SAML setting examples
Okta
Please visit Okta help instructions.
-
Create an integration.
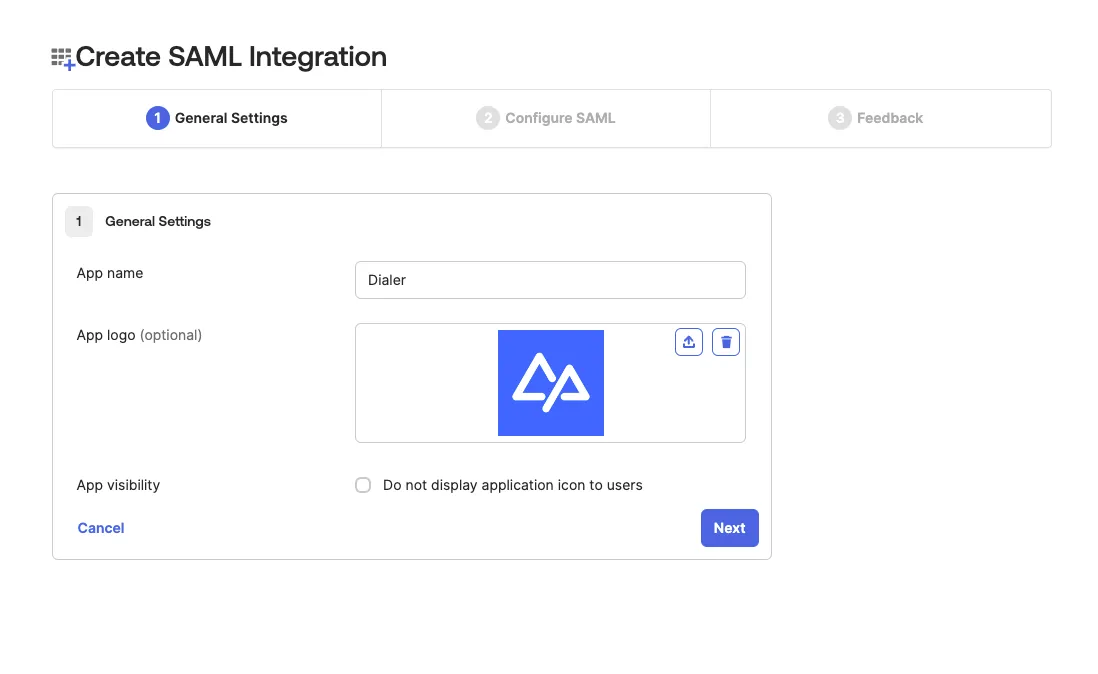
Create SAML Integration page - step 1
-
Insert the Dialer or Cloud PBX account access URL and issuer URL.
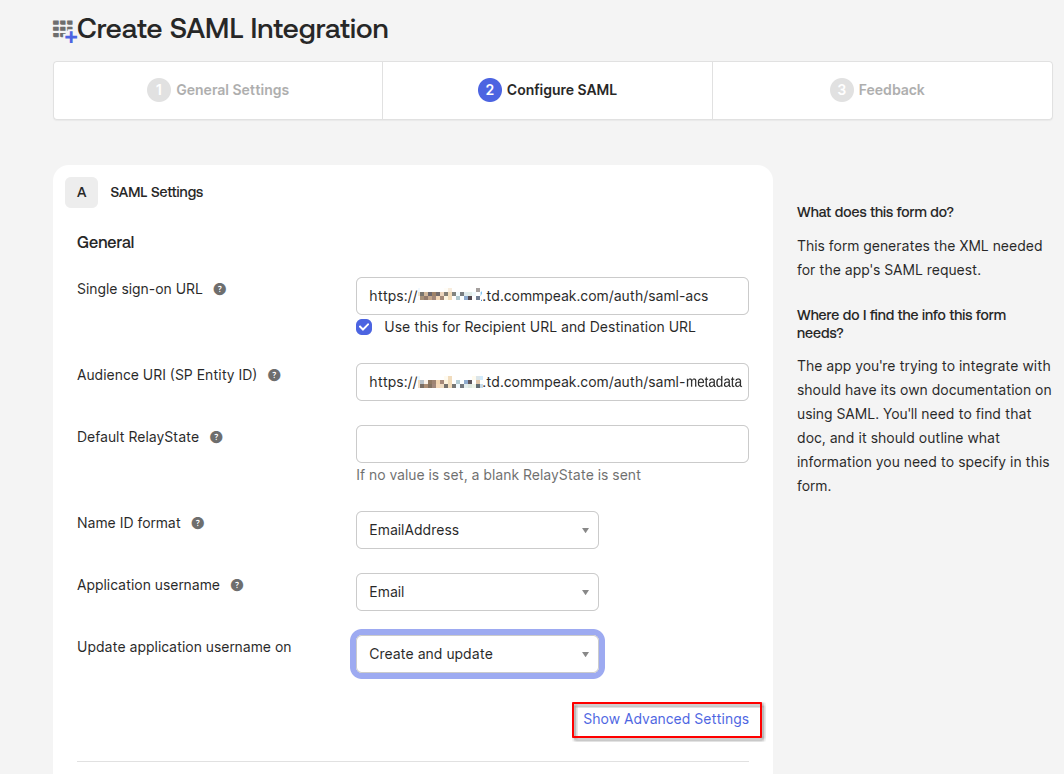
- Advanced settings.
Make sure to set "Response", "Assertion Signiture" to Signed , "Assertion Encryption" to "Unencrypted", Signature Algorithm to "RSA-SHA256",
SAML Issuer ID is your issues URL from your Dialer.
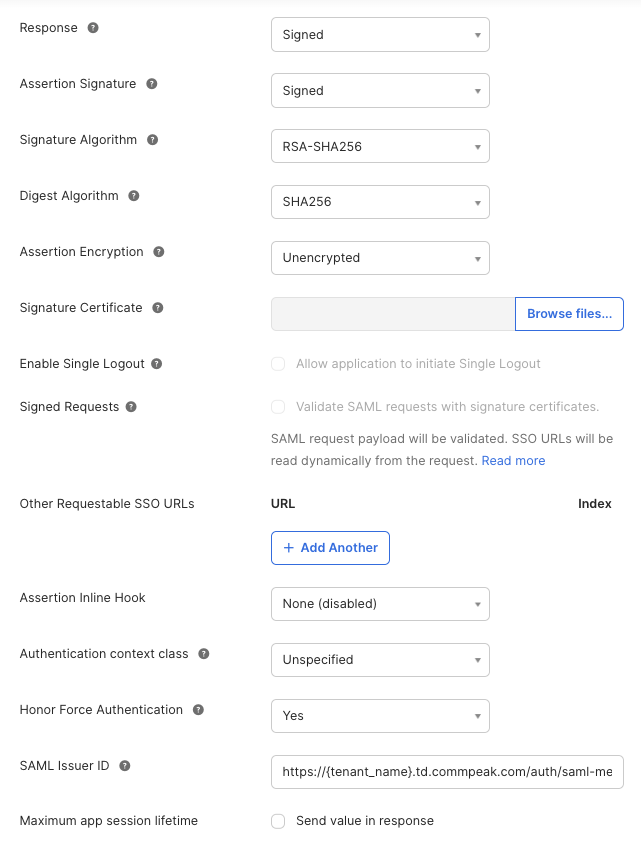
Advanced settings
-
Attributes setup:
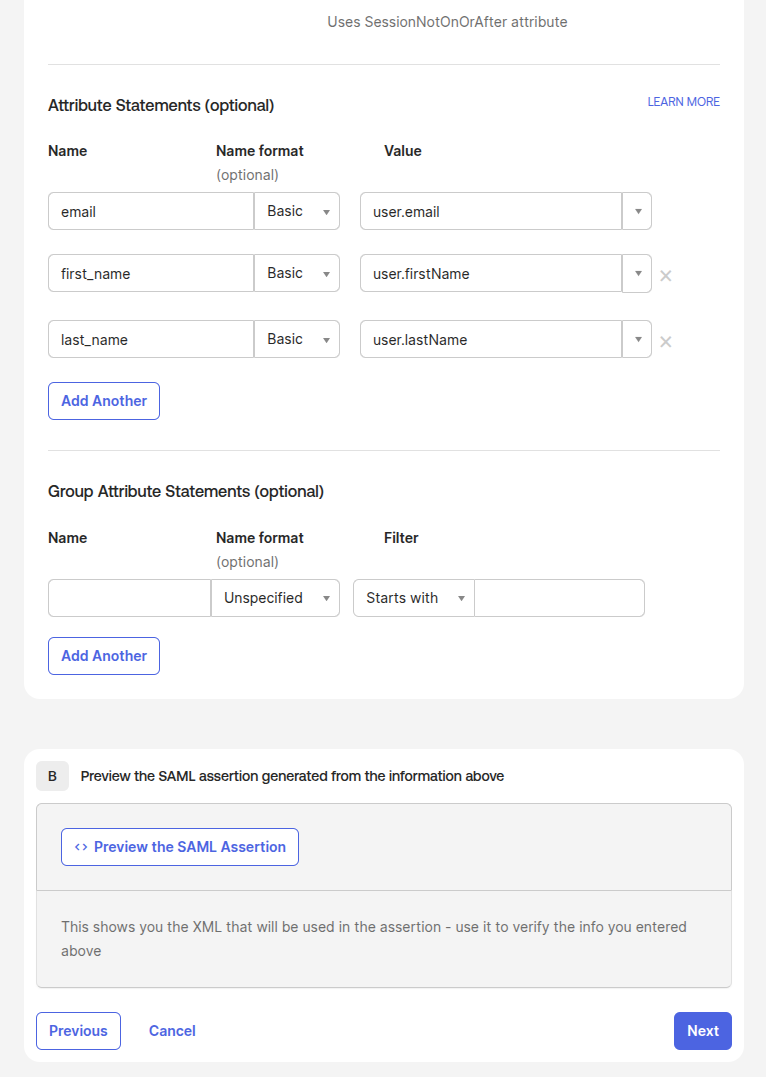
Advenced Settings
- Now, you can assign users in your organization to sign in via the Dialer or Cloud PBX SAML login.
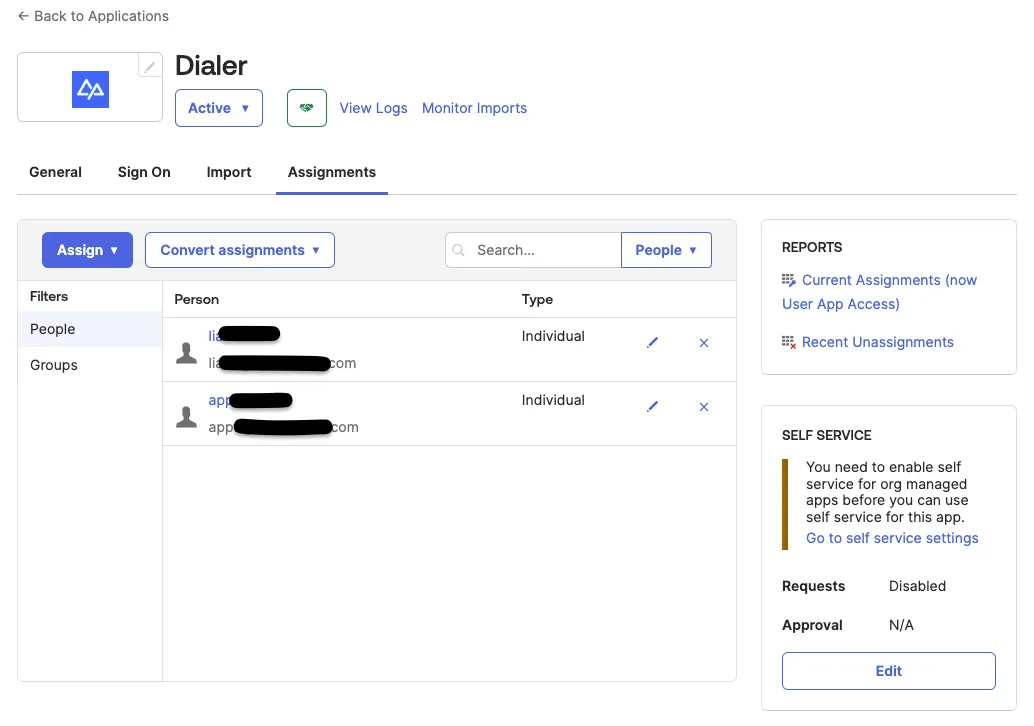
Assigning users action
-
Go to Sign on tab, use the Sign On URL inside your Dialer setup SAML settings.
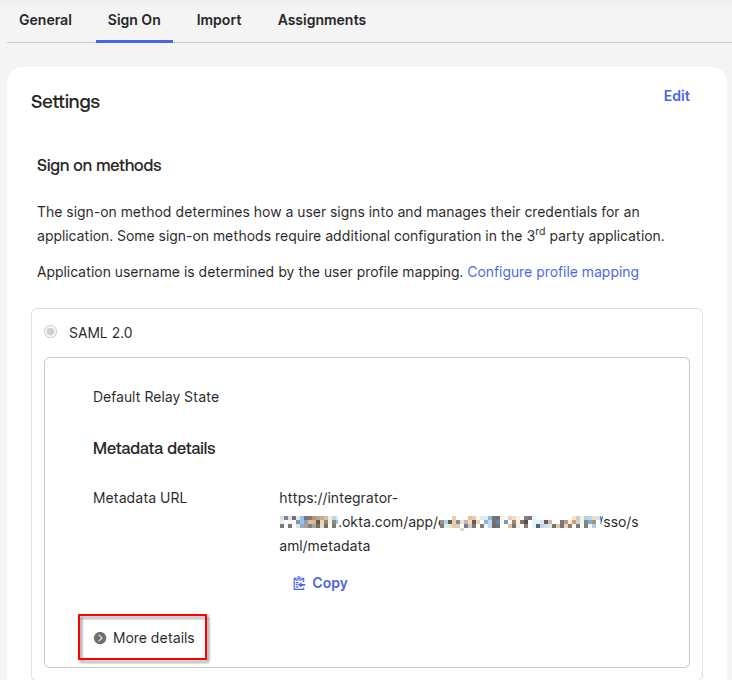
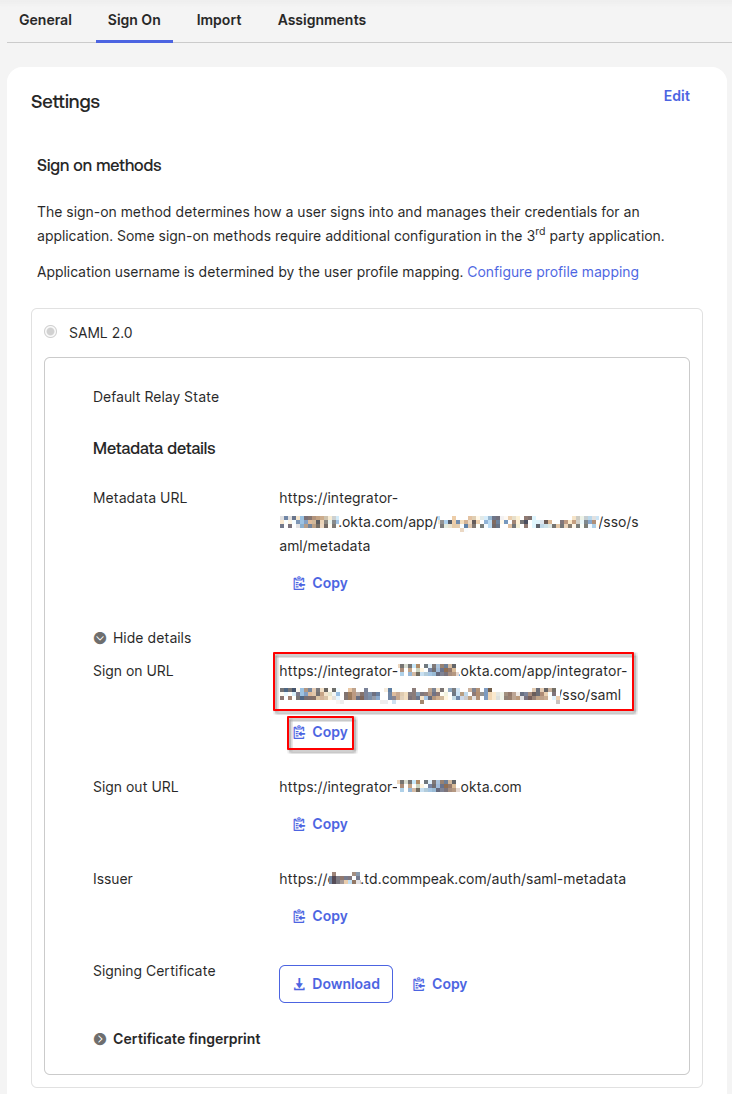
-
Go to Sign on tab, use the SAML Signing Certificates section:
On the active certificate row → Actions → Download certificate.
Open the file in a text editor, copy the contents, paste into your Dialer field "SAML identity provider certificate".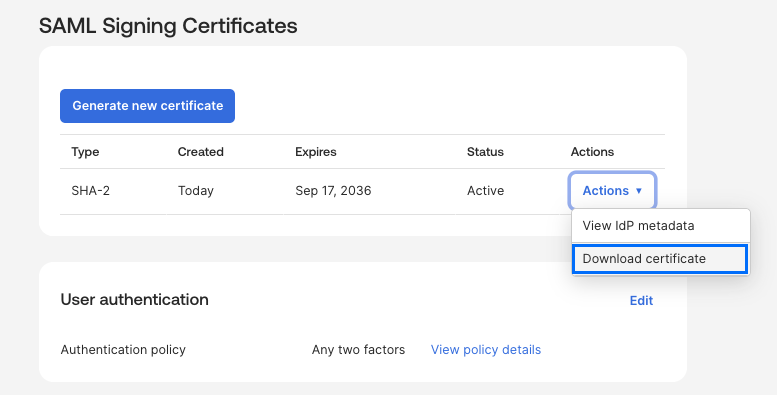
Google
Please visit Google help instructions.
-
Click Add custom SAML app.
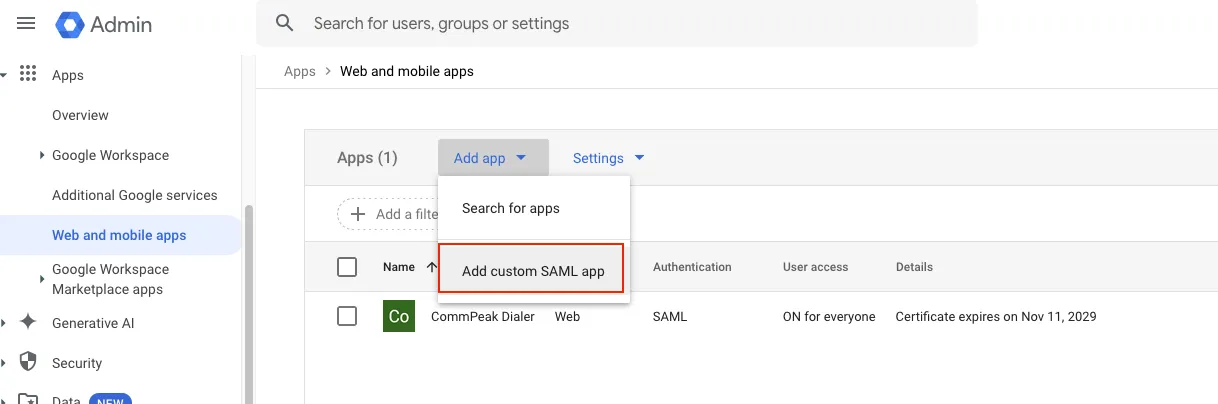
Apps with the Add custom SAML app option highlighted
-
Enter CommPeak Dialer, then click CONTINUE.
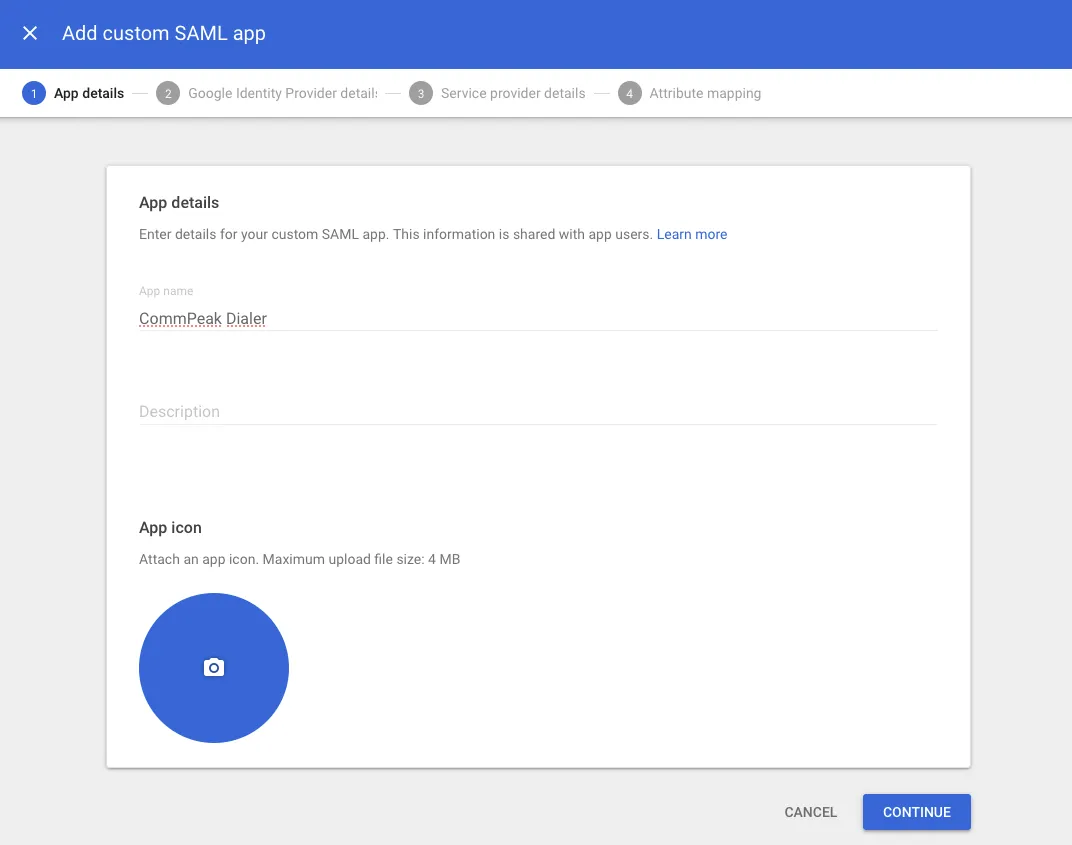
App Details form
-
Copy the SSO URL to the Dialer SAML IDP Login URL.
Copy Certificate to the Dialer SAML identity provider certificate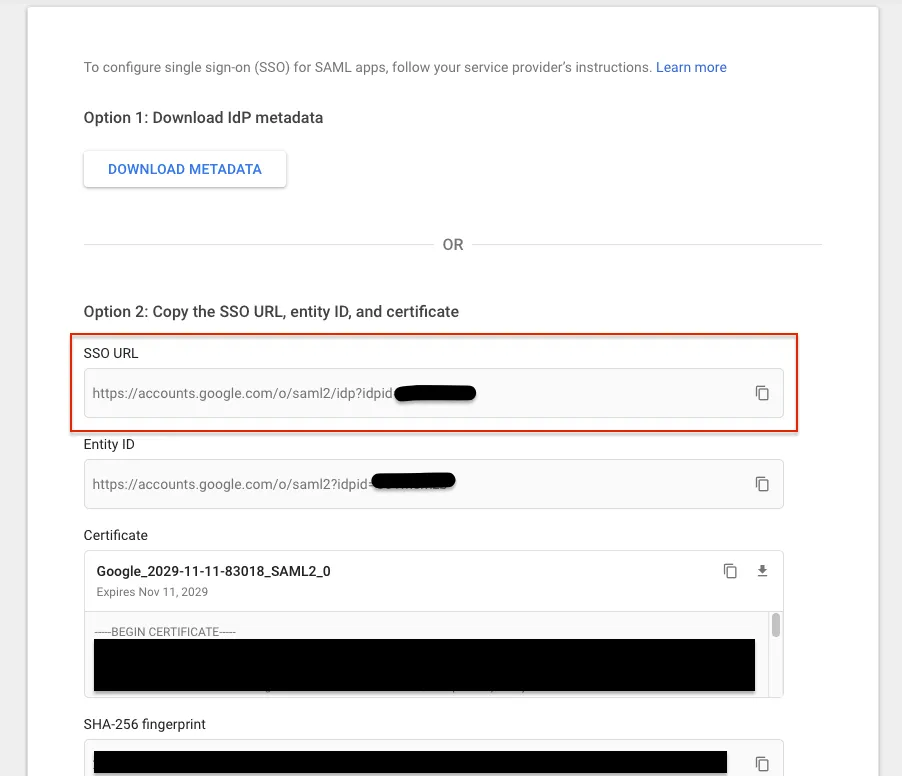
Configuration with SSO URL
-
Insert the Dialer issuer URL and ACS URL here.
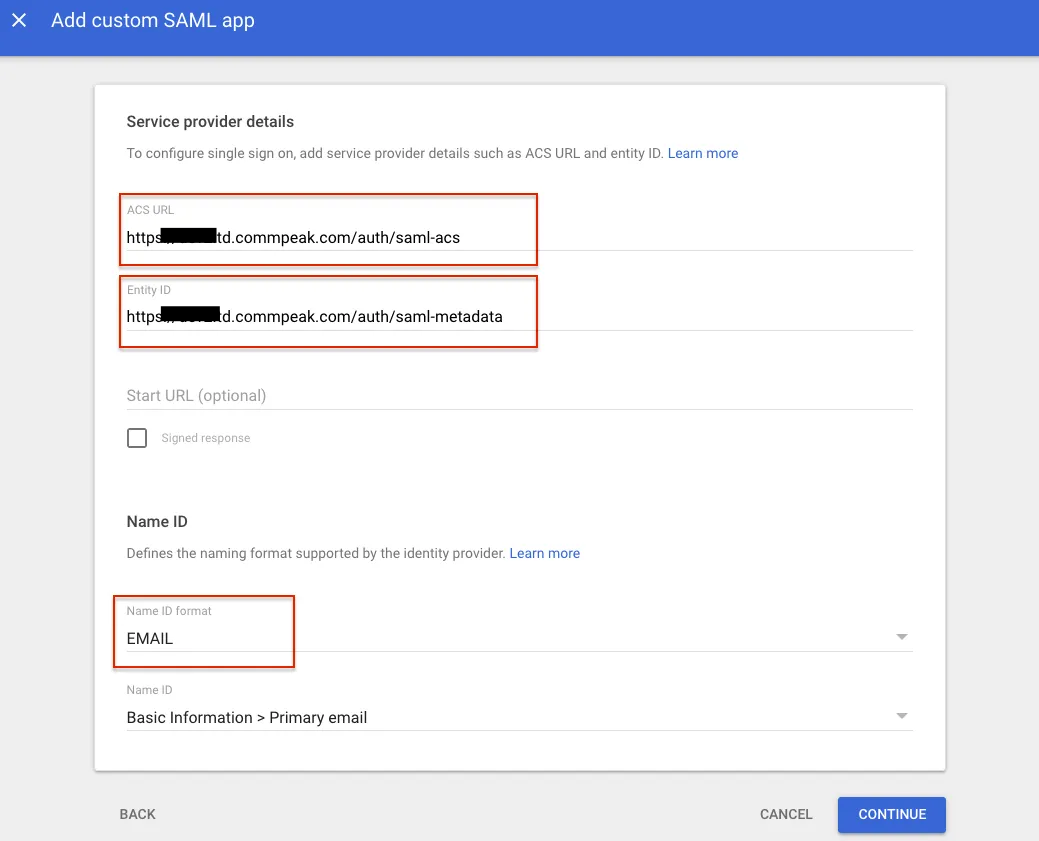
Adding custom SAML
-
After the setup is complete, you can test the login. Click TEST SAML LOGIN and proceed.
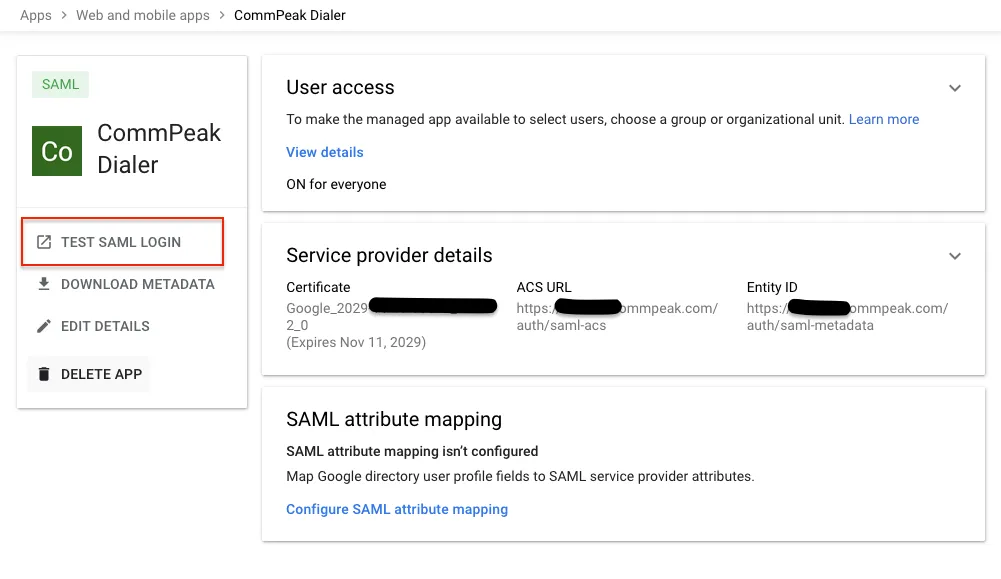
Testing the SAML login configuration
Microsoft Azure
-
In portal.azure.com find "Enterprise Applications"
-
Click on "New application" in the top bar
-
Search for “Microsoft Entra SAML Toolkit”, click on it, and install it by pressing the “Create” button in the right sidebar.
-
In the left pane, find "Properties" under "Manage", and set "Assignment Required" to "No". (This step might not be required, but assignment to groups and users must be defined instead)
-
Go to “Single sign-on” in the left pane under "Manage" and select "SAML"
-
In "Basic SAML Configuration" define the following (replace dialer domain with the correct one):
-
Identifier (Entity ID):
<https://{account_name}.td.commpeak.com/auth/saml-metadata> -
Reply URL (Assertion Consumer Service URL):
<https://{account_name}.td.commpeak.com/auth/saml-acs> -
Sign on URL:
<https://{account_name}.td.commpeak.com/auth/saml>
-
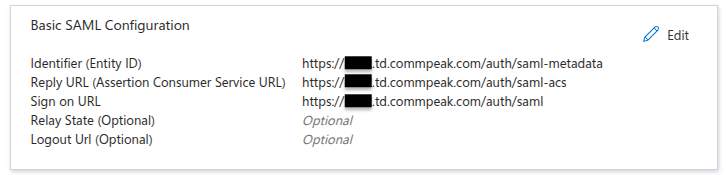
-
Download your SAML Certificates:
Microsoft Entra admin center → Entra ID → Enterprise applications → Your app name → Single sign-on, then the SAML Certificates section (step 3 on that page):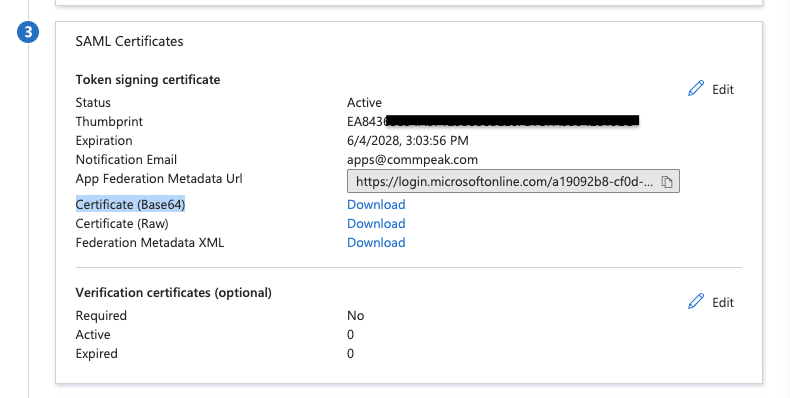
Download : Certificate (Base64) downloads a text file, open it in a text editor and copy the contents into Dialer field "SAML identity provider certificate". -
Edit "Attributes & Claims" and verify "Required claim" configuration to have:
- Name identifier format - Email address
- Source attribute - user.mail
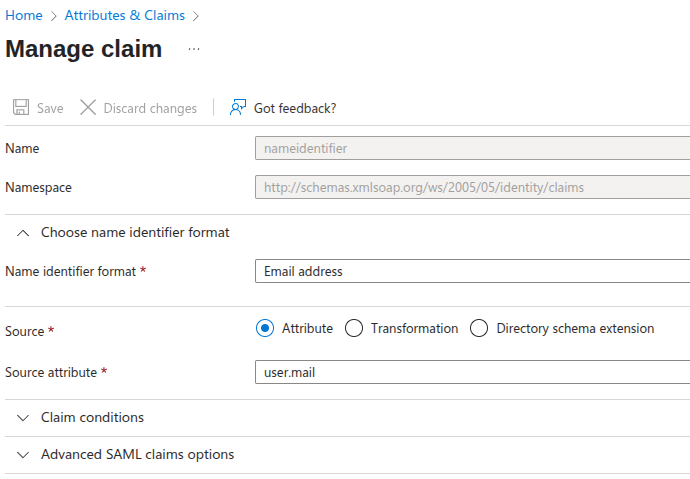
- Edit “Advanced SAML claims options” under “Advanced settings” and check the following checkboxes:
- Include attribute name format
- Append application ID to issuer
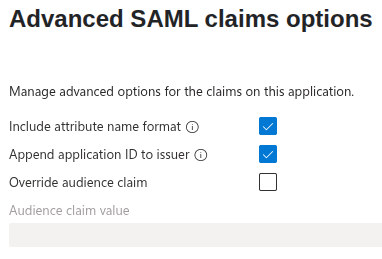
-
From “Set up Microsoft Entra SAML Toolkit” copy “Login URL” and place it in Tenant Settigns in Dialer as SAML Login URL
-
Your SAML Login LDP URL on dialer should looks like
https://login.microsoftonline.com/{azure_app_id}/saml2For more info, please visit Microsoft Azure help instructions page.
SAML login error messages
When a Login via SSO attempt fails, the Dialer or Cloud PBX returns the user to the login page with a message that names the cause. Each message ends with a six-character reference, for example (Reference 589D4D). The message describes the identity provider configuration only. It never shows anything from the user's identity or from the IdP response.
NOTEMost of these messages point to a setting in your IdP application, not in the Dialer. Compare the message with the matching setting in the SAML Setting Examples for your provider. If the fix isn't clear, send the reference code to our support team: it identifies the exact failed attempt and what your IdP sent.
| Message | Cause | What to do |
|---|---|---|
| SSO login failed: no login response was received from your identity provider. Start the login again from this page. | The login page was reached without a SAML response, usually by refreshing or reopening the browser tab after an earlier attempt. | Click Login via SSO again. |
| SSO login failed: the identity provider response could not be read. Ask your SSO administrator to check the application configuration. | The IdP sent something that isn't a valid SAML 2.0 response. | In the IdP application, make sure the protocol is SAML 2.0 and the binding is HTTP-POST to the ACS URL. |
| SSO login failed: your identity provider sends encrypted assertions, which are not supported. Ask your SSO administrator to disable assertion encryption. | The IdP encrypts the assertion. The Dialer and Cloud PBX accept signed, unencrypted assertions only. | Okta: set Assertion Encryption to Unencrypted. Azure: don't enable token encryption for the application. |
| SSO login failed: your identity provider sent an unsigned response. Ask your SSO administrator to enable response or assertion signing. | Neither the response nor the assertion is signed, so the Dialer can't verify who sent it. | Okta: set Response or Assertion Signature to Signed under Show Advanced Settings (both Signed is recommended). Google and Azure sign assertions by default. |
| SSO login failed: no identity provider certificate is configured for this account. Ask your administrator to add it under General Settings. | SAML Login URL is set but the SAML identity provider certificate field is empty. | Download the signing certificate from the IdP application and paste it into Settings > General Settings > Login Configuration > SAML identity provider certificate. |
| SSO login failed: the identity provider certificate does not match the one configured for this account. Ask your administrator to update it under General Settings. | The response is signed with a certificate that isn't configured for this account. Typical reasons: the IdP rotated its certificate, the certificate was taken from another application (each Okta application has its own), or the pasted text is incomplete. | Download the active certificate from the IdP application and paste it into Login Configuration. You can keep several certificate rows, so add the new one before removing the old one during a rotation. |
| SSO login failed: your identity provider is configured for a different account. Ask your SSO administrator to set the Audience / Entity ID to a URL on this account's domain. | The assertion's Audience (Okta: Audience URI (SP Entity ID), Google: Entity ID, Azure: Identifier (Entity ID)) points to another host. | Set it to a URL on your account's domain. The Issuer URL shown in Login Configuration, https://{account_name}.td.commpeak.com/auth/saml-metadata, is the recommended value. Any URL on the same domain is accepted. |
| SSO login failed: your identity provider is configured for a different account. Ask your SSO administrator to set the Recipient / Reply URL to this account's login URL. | The assertion's Recipient (Okta: Recipient URL, Azure: Reply URL) points to another host. | Set it to your account's ACS URL, https://{account_name}.td.commpeak.com/auth/saml-acs. |
| SSO login failed: the login response has expired. Check the clock on the identity provider and try again. | The assertion's validity window has passed. Either an old tab was submitted, or the IdP clock is off by more than two minutes. | Click Login via SSO again. If it repeats, have the IdP administrator check the server time. |
| SSO login failed: the identity provider response did not include your email address. Ask your SSO administrator to send the email as the Name ID. | The assertion has no Name ID, or it isn't the user's email. | Okta: Name ID format EmailAddress, Application username Email. Google: Name ID = Basic Information > Primary email. Azure: Name identifier format Email address, Source attribute user.mail. |
| Error initiate SAML details or no user found for email … | The IdP authenticated the user, but no active user with that email exists in the Dialer or Cloud PBX. | Create the user, or set the email of the existing user to the one the IdP sends. Deleted or inactive users can't log in with SAML. |
Updated 5 days ago