Configuring SIP Account in Softphone App
Register your SIP account using either the CommPeak softphone, a third-party application, or an IP phone of your choice.
After signing up with CommPeak and getting your SIP account credentials, your next step is registering your SIP account in CommPeak Softphone, a third-party application, or with your IP phone to make your first call.
TIPYou can also use the Built-in CommPeak Softphone with your JWT-enabled SIP accounts to place calls right from your browser. You can read more in the Built-in Softphone for JWT-Enabled SIP Accounts article.
Video Tutorial
TIPWith CommPeak Softphone, you get an enterprise-level tool without installing any third-party software.
IMPORTANTIf you're using third-party SIP clients (not CommPeak's Softphone), you must manually enable SRTP (Secure Real-Time Transport Protocol) when using TLS for SIP transport. This ensures media encryption and compatibility.
IMPORTANTBefore starting, sign up with CommPeak and get your SIP account credentials.
To configure your SIP Account in CommPeak Softphone:
-
Download and install the standalone Softphone or proceed with the Built-in CommPeak Softphone or the Web based Softphone Widget. Learn more in Getting Started.
NOTECurrently, CommPeak Softphone is available for Windows and Ubuntu operating systems. Find more information in the System Requirements article.
-
Find the SIP credentials and server name in your account at the CommPeak Portal. Log in to your CommPeak account and go to VoIP Services > SIP Accounts.
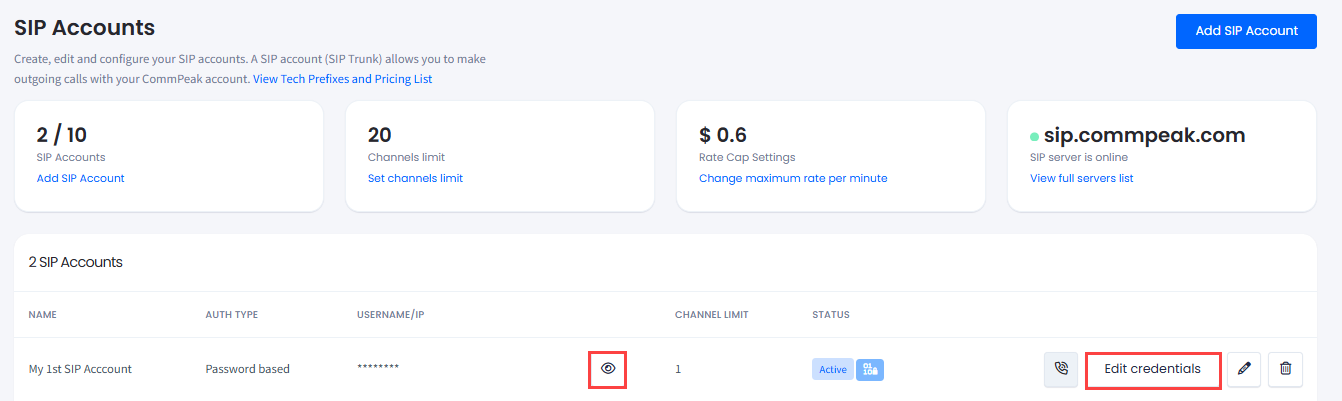
VoIP Services > SIP Accounts table
- User - click the eye icon under Username/IP in a SIP account line to show the username.
- Password - click Edit credentials if you forgot it
- Domain - use one of the server names in the Server status section, or just use sip.commpeak.com.
-
Launch the softphone and enter the data described above.
-
Click LOGIN & START CALLING.
NOTEPlease see the SIP Account Configuration article to learn more about your options for registering your SIP account with a third-party application or using your IP phone to make your first call.
IMPORTANTIf you're using third-party SIP clients (not CommPeak's Softphone), you must manually enable SRTP (Secure Real-Time Transport Protocol) when using TLS for SIP transport. This ensures media encryption and compatibility.
Updated about 1 month ago