Setting Up a SIP Trunk in FreeSWITCH
This guide provides step-by-step instructions on how to add a SIP trunk in FreeSWITCH.
After signing up with CommPeak and getting your SIP account credentials, your next step is registering your SIP account in CommPeak Softphone, a third-party application, or with your IP phone to make your first call.
TIPYou can also use the Built-in CommPeak Softphone with your JWT-enabled SIP accounts to place calls right from your browser. You can read more in the Built-in Softphone for JWT-Enabled SIP Accounts article.
Video Tutorial
TIPWith CommPeak Softphone, you get an enterprise-level tool without installing any third-party software.
IMPORTANTIf you're using third-party SIP clients (not CommPeak's Softphone), you must manually enable SRTP (Secure Real-Time Transport Protocol) when using TLS for SIP transport. This ensures media encryption and compatibility.
This document will guide you on how to add a SIP trunk in FreeSWITCH, also known as a gateway in FreeSWITCH terminology.
Prerequisites
Make sure you have the following:
-
an installed and running FreeSWITCH server
-
a SIP account from CommPeak
The SIP credentials and domain details that you need are available in your account at CommPeak Portal in Setup > SIP Accounts: -
User - click SHOW under Username/IP in a SIP account line
-
Password - click Reset Password if you forgot it
-
Domain - sip.commpeak.com
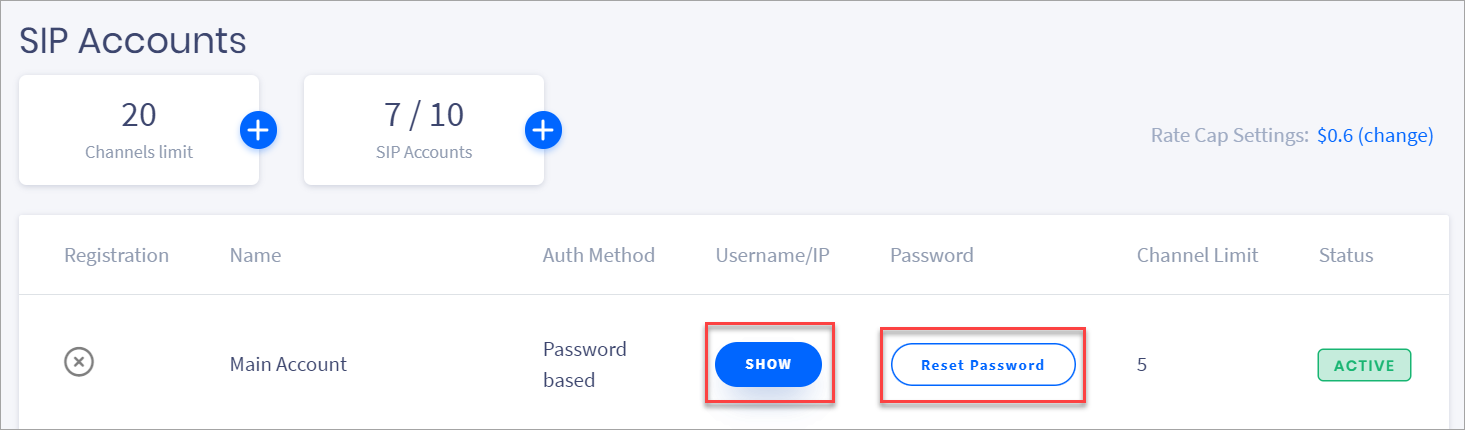
SIP account data in CommPeak Portal
Adding a SIP Trunk
Step 1: Access FreeSWITCH
First, you need to access your FreeSWITCH server. This can usually be done via SSH. Run the command similar to the following:
ssh user@your_freeswitch_server_ipStep 2: Locate SIP Profile Directory
FreeSWITCH configurations are stored in XML files located under /etc/freeswitch. Navigate to the sip_profiles directory, which contains files for external SIP profiles.
cd /etc/freeswitch/sip_profiles/externalStep 3: Create SIP Gateway Configuration File
- Create a new XML file in this directory for your SIP gateway. You can give it any name, e.g., commpeak_gateway.xml.
- Open the new file using a text editor. Here we're using nano, but you can use your preferred editor:
sudo nano commpeak_gateway.xmlStep 4: Edit SIP Gateway Configuration File
- In the newly created my_sip_gateway.xml file, include the following configuration:
1. <include><gateway name="commpeak_gateway"> <param name="username" value="yourusername"/> <param name="password" value="yoursecret"/> <param name="proxy" value="sip.commpeak.com"/> <param name="register" value="true"/></gateway></include> - Enter the following data in this configuration:
- my_sip_gateway is the name of your SIP gateway
- yourusername is your SIP username
- yoursecret is your SIP password
- sip.commpeak.com is your SIP domain.
- Save and exit the file.
Step 5: Reload SIP Profile
To apply the changes, you must reload the SIP profile in FreeSWITCH.
- Access the FreeSWITCH CLI:
fs_cli - Then reload the SIP profile:
reloadxmlsofia profile external rescan
Step 6: Verify SIP Gateway Registration
After reloading, you can verify if the gateway registration was successful by checking the SIP gateways:
sofia status gateway commpeak_gatewayThe status should be REGED if the gateway is registered correctly.
Step 7: Configure Dialplan
You'll need to set up your dialplan to use this SIP Gateway. The dialplan in FreeSWITCH controls how incoming and outgoing calls are handled and routed.
- Navigate to the dialplan directory:
cd /etc/freeswitch/dialplan - Open the default.xml file or any specific dialplan file you're using:
sudo nano default.xml - Add a new extension to route calls to your new SIP gateway. An XML example might look as follows:
This example contains the following data:<extension name="outbound_to_commpeak_gateway"> <condition field="destination_number" expression="^(\d+)$"> <action application="bridge" data="sofia/gateway/commpeak_gateway/$1"/> </condition></extension>- outbound_to_commpeak_gateway: the extension name
- condition: the field that checks the destination number
- ^(\d+)$: the expression matches any number
- bridge: the action used to connect the call to the SIP gateway
- commpeak_gateway: the name of your gateway
- $1: represents the captured group from the expression (i.e., the dialed number).
- Save and exit the file.
Step 8: Reload Dialplan
Now you need to reload the dialplan for the changes to take effect. In the FreeSWITCH CLI, execute:
reloadxmlStep 9: Test the SIP Gateway
Finally, you can make a test call to verify everything works correctly. You can do this from a registered SIP device (like a Softphone or IP Phone) configured to use your FreeSWITCH server.
Troubleshooting
If you encounter any issues, you can use the FreeSWITCH CLI for troubleshooting by executing the following command:
sofia loglevel all 9It will provide detailed information about SIP communication and allow you to identify any issues.
Updated 6 months ago