

Data Connectors
Connect your own APIs to the TextPeak Inbox so agents can see and act on CRM, billing, or order data in conversations. Learn how to build, test, and publish a connector and read its request logs.
A data connector calls one of your own APIs, such as your CRM, billing, or order system, so your agents can see and act on that data without leaving a conversation. You build the request once, test it against your API, and choose which fields of the response agents get to see. Sidebar widgets then show that data inside the conversation.
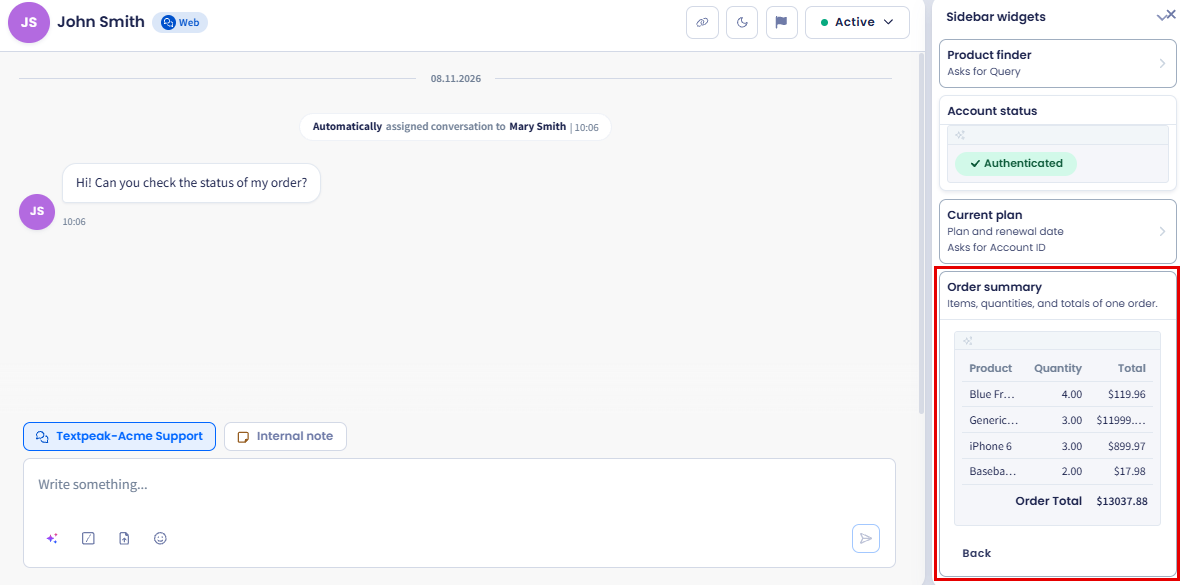
Data from your API in a conversation's Sidebar widgets section
This article walks you through creating, testing, and publishing a connector, and checking the calls it makes.
NOTETo create and manage data connectors, you need the Inbox admin role, or an Inbox manager role with the Manage data connectors permission. For a breakdown of what each role can do, see the Inbox Role Permissions page.
To open the Data Connectors page:
Log in to TextPeak
In your browser, log in to TextPeak with manager access privileges.
Open Inbox
In the main TextPeak menu, select the Inbox tab.
Open Settings
Click Settings at the bottom of the Inbox sidebar.
Open Data Connectors
In the Automation group, click Data Connectors.
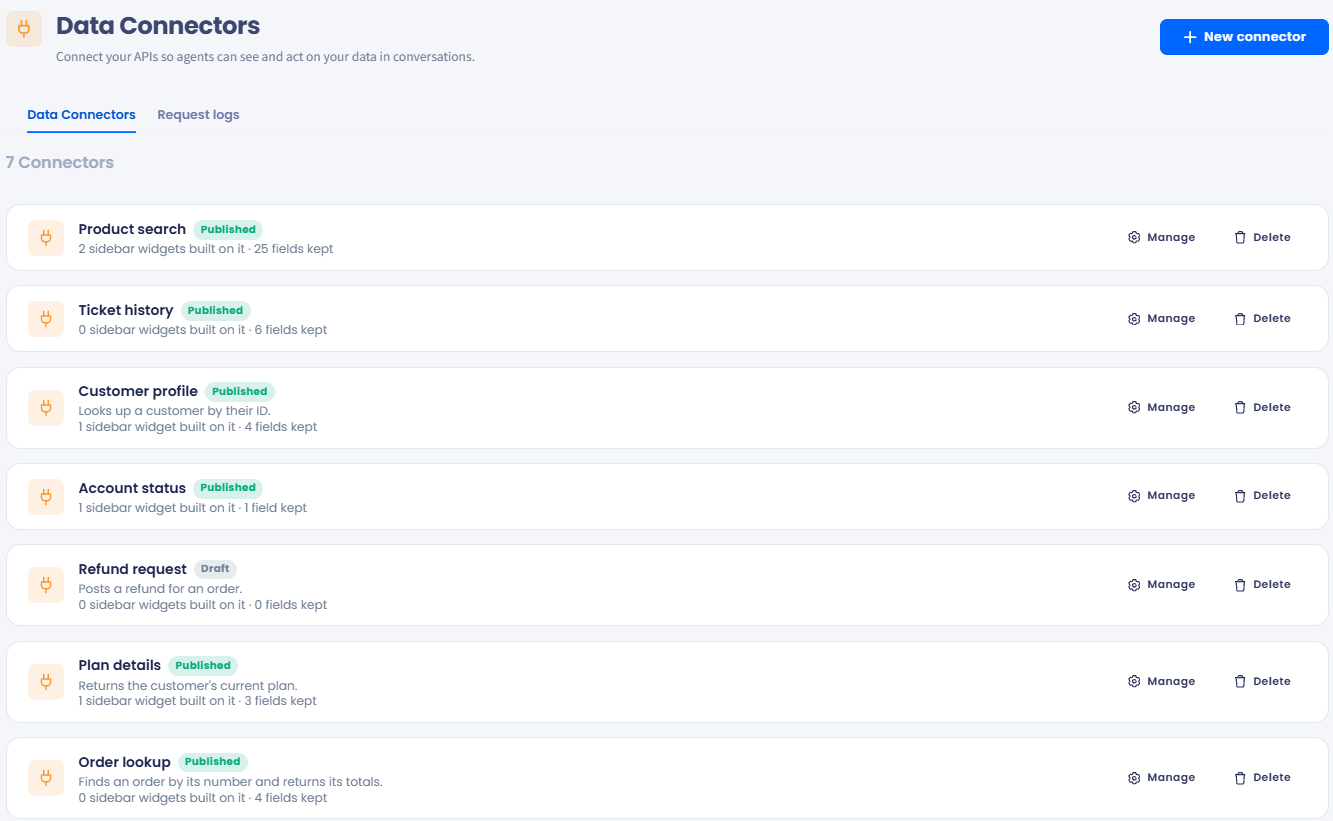
The Data Connectors page
Each connector appears as a card with its status, Published or Draft, the number of sidebar widgets built on it, and the number of fields it saves. Use Manage to open a connector and Delete to remove it.
How a connector works
A connector is one API request that TextPeak sends on your behalf:
- Request: the method, the address, the headers, and the body TextPeak sends. Tokens in the request are replaced with details from the conversation, such as the contact's phone number, or with values the agent enters.
- Fields: the parts of the response you choose to save, each with a label agents read.
- Widgets: a sidebar widget picks a published connector and shows its fields in the conversation. A widget never receives the raw response, only the fields you saved.
A connector can fetch data, for example a full CRM record found by the contact's phone number, or take an action in your platform, for example a refund with an amount the agent enters.
Creating a connector
A new connector goes through four steps: Details, Request, Test & fields, and Publish.
Naming the connector
Start a new connector
On the Data Connectors page, click New connector.
Name the connector
In Name, enter a name. It identifies the connector in settings and in the request logs.
Describe the connector
Optionally, in Description, add a line of context for whoever maintains the connector later.
Continue
Click Next.
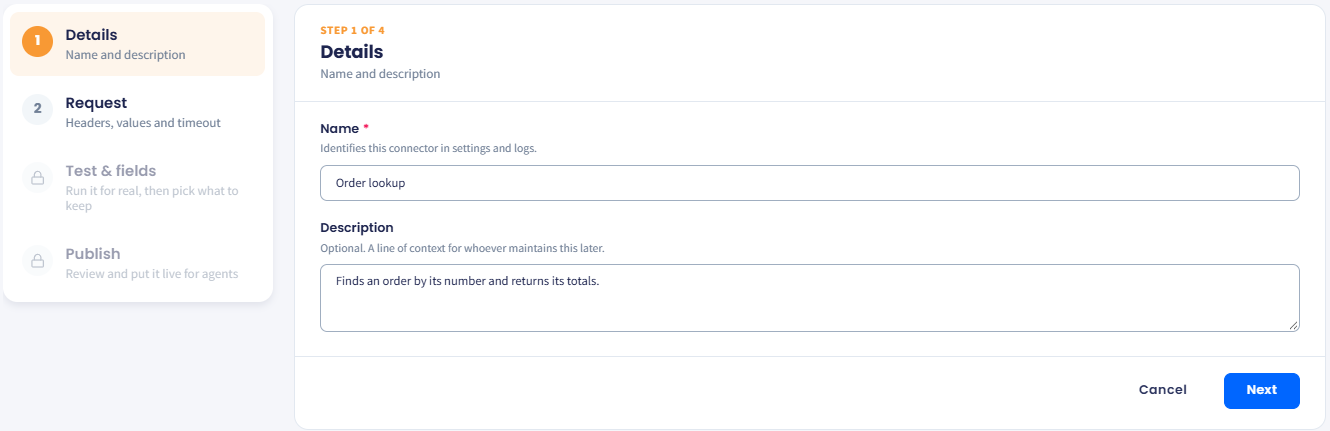
Step 1 of 4: Details
Setting up the request
Choose a credential
If your API needs a key or a token, click Choose a credential and select a saved credential or create one. See Adding a credential.
Add the values agents fill in
Under Values you'll fill in later, click Add value for each detail the agent supplies when the connector runs, such as an order number or a refund amount. Enter its Name, select its Type (string, number, or boolean), and select whether it is Required or Optional. Each value becomes a token, such as {{input.order_id}}. A lookup that needs only the contact's details does not need any values.
Enter the address
Under Call, select the method (GET, POST, PUT, PATCH, or DELETE) and enter the address of your API. The address must start with https://. To add a token, click Insert token and select it from the list.
Add headers
Under Headers, enter a Key and a Value for each header your API expects, such as Accept and application/json. To send a credential, reference it in a header value, for example Bearer followed by its token. Click Add header for more.
Write the body
For a POST, PUT, PATCH, or DELETE request, write the JSON body in the Body editor. You can insert tokens here too. A GET request has no body.
Set the timeout
In Timeout, enter how long TextPeak waits for your API to answer, between 1000 and 15000 ms. The default is 10000 ms.
Save the request
Click Save & next.
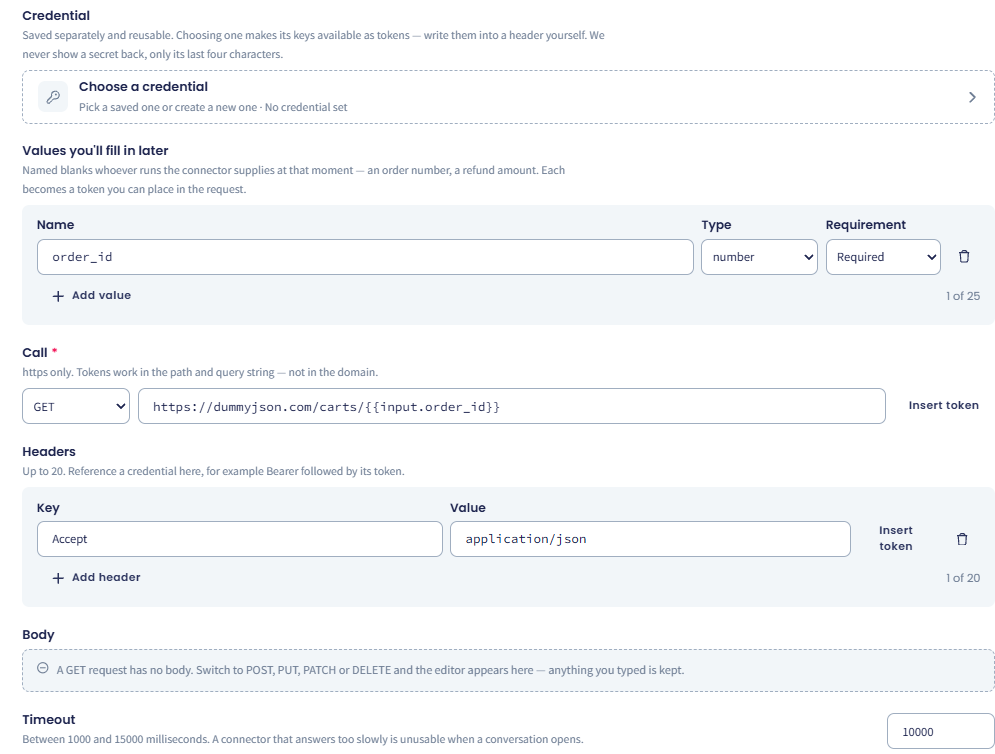
Step 2 of 4: Request
| Limit | Value |
|---|---|
| Values you'll fill in later | Up to 25 |
| Headers | Up to 20 |
| Timeout | 1000–15000 ms |
| Tokens in the address | In the path and the query string only, not in the domain |
TIPSet the timeout as short as your API allows. A widget that runs when a conversation opens waits for the connector, and a slow answer leaves the agent looking at an empty widget.
Tokens from the conversation
Click Insert token next to the address, a header, or the body to add any of these. TextPeak replaces each token with the value from the conversation the connector runs in.
| Token | Replaced with |
|---|---|
{{contact.phone}} | The contact's phone number |
{{contact.name}} | The contact's name |
{{contact.id}} | The contact's ID in TextPeak |
{{contact.lead_id}} | The contact's lead ID |
{{contact.external_id}} | The contact's external ID |
{{conversation.uuid}} | The conversation's unique ID |
{{conversation.status}} | The conversation's status, for example open |
{{conversation.vendor}} | The channel the conversation is on, for example whatsapp |
{{conversation.subject}} | The conversation's subject |
{{stream.uuid}} | The unique ID of the channel the conversation arrived on |
{{stream.account_phone_number}} | The phone number of that channel |
{{input.<name>}} | The value the agent enters for a value you added under Values you'll fill in later |
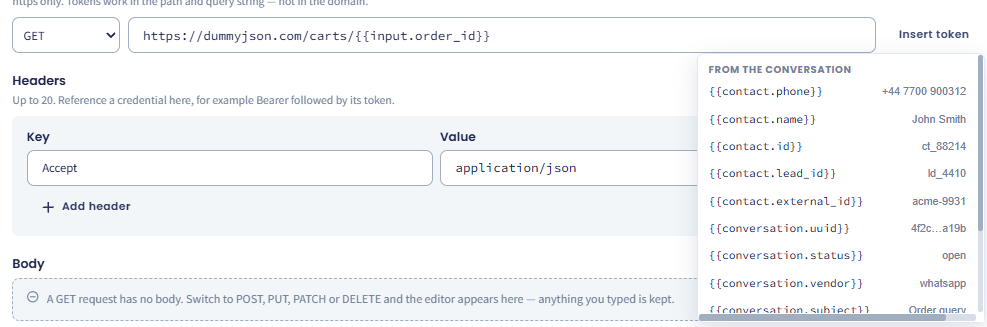
The Insert token list
Testing the connector and choosing fields
The test calls your API for real, so you see exactly what comes back before agents do.
Fill in the test values
Under Values for this test run, enter a real value for each token in your request, such as an order number that exists in your system. TextPeak uses these values for this test only and never saves them.
Run the test
Click Run test. When the call succeeds, Test passed shows the status code, the response time, and the number of records. What we sent shows the request with the tokens filled in, and Their response shows what your API returned.
Pick the fields
Under Fields to keep, select the fields you want agents to see. Each field shows its type and a sample value; use Search fields to find one in a long response. If the response holds a list, such as the items of an order, agents get one row per item.
Label the fields
In Label, enter the name agents see for each selected field.
Continue
Click Save & next. You need at least one field to continue.
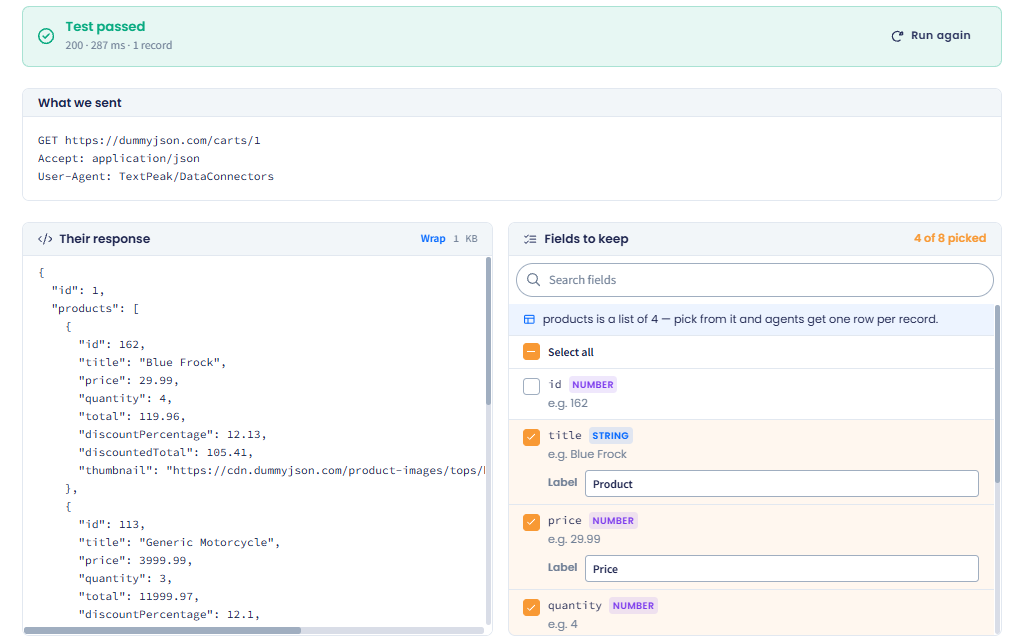
Step 3 of 4: Test & fields
If the test fails, check the address, the headers, and the test values, then click Run again.
Publishing the connector
The Publish step shows the connector exactly as it was tested: its name, description, address, headers, credential, values, timeout, and the fields agents will see.
Review the connector
Check the summary. To change anything, click Back.
Publish
Click Publish connector.
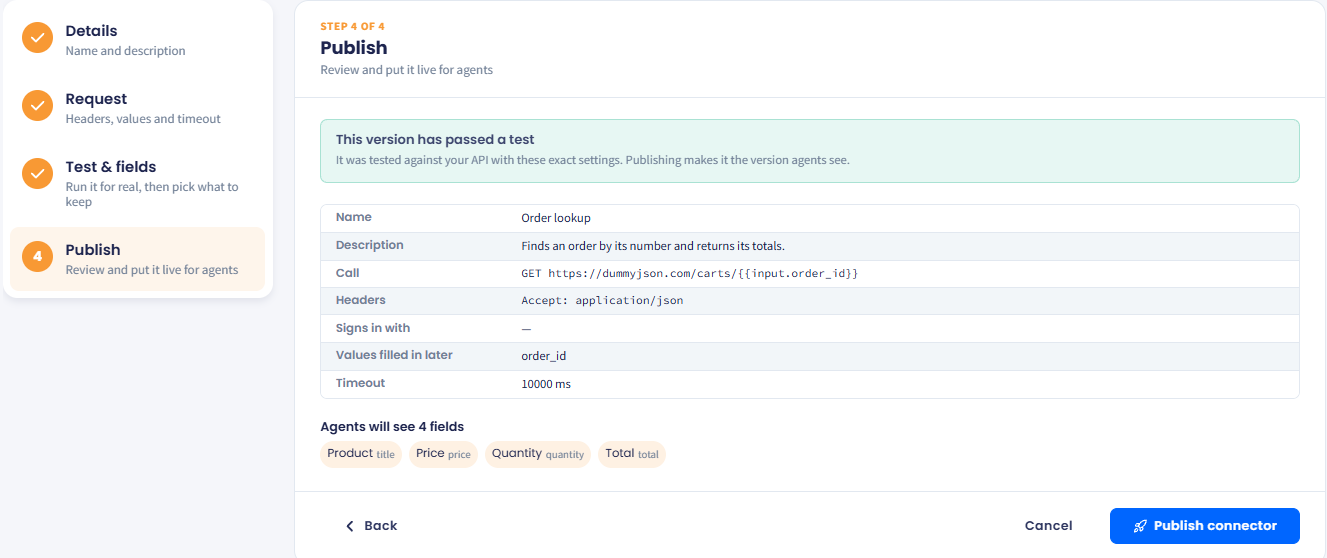
Step 4 of 4: Publish
Publishing makes this version the one agents see, and the connector can now carry sidebar widgets. A connector you leave before publishing stays on the list as a Draft.
Adding a credential
Credentials hold the keys and tokens your API needs. You save a credential once and reuse it in other connectors. TextPeak stores secrets encrypted and never shows them back, only their last four characters.
Open the credentials
On the Request step, click Choose a credential.
Create a credential
Open the Create new tab.
Name the credential
In Name, enter the name the credential is listed under.
Add the keys
Under Keys and values, enter each Key and its Value. Keys use lowercase letters, digits, and underscores. Click Add key for more.
Save the credential
Click Save and use.
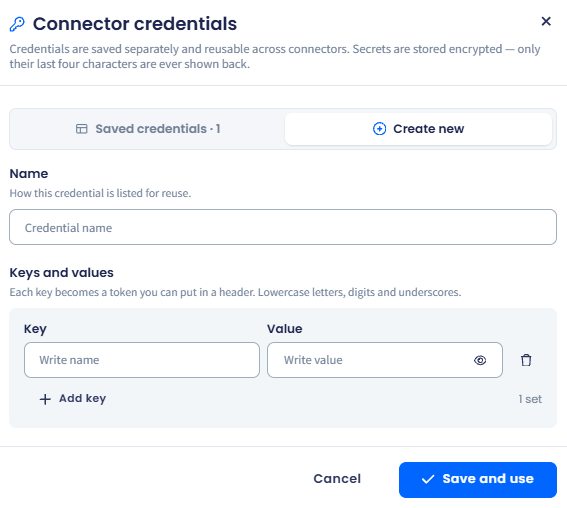
Creating a credential in Connector credentials
Each key becomes a token, {{credentials.<key>}}, that you place in a header yourself. For example, a credential with the key token goes into an Authorization header as Bearer {{credentials.token}}. To reuse a credential, open the Saved credentials tab, select it, and click Use credential.
Changing a connector
Open the connector
On the Data Connectors page, click Manage on the connector.
Make your changes
Change the request under Connector settings, or rename field labels under Fields agents see.
Test again
If you changed the request, run a new test. Save changes stays disabled until the connector passes a test with the new settings.
Save the changes
Click Save changes. To undo your edits instead, click Discard.
A renamed label updates every sidebar widget built on the connector.
Checking the request logs
The Request logs tab lists every call your connectors make, newest first.
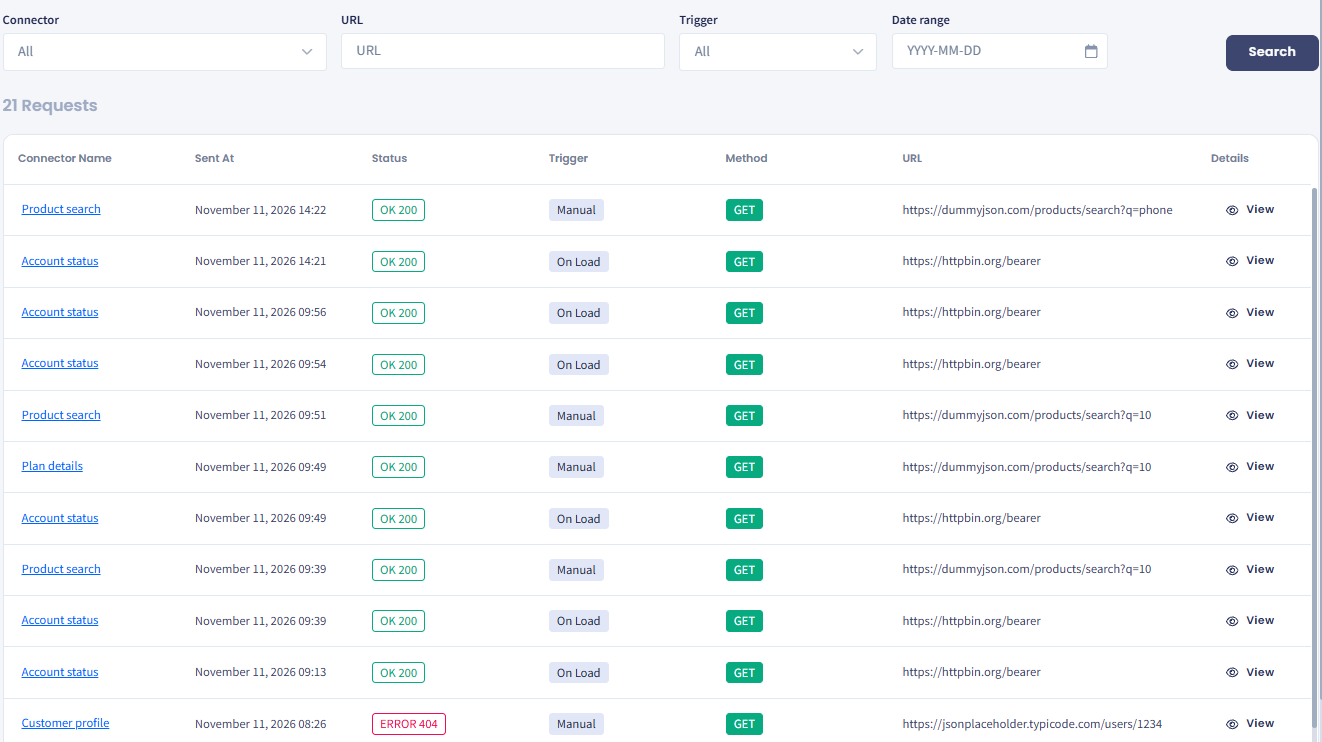
The Request logs tab
| Column | What it shows |
|---|---|
| Connector Name | The connector that made the call. |
| Sent At | The date and time of the call. |
| Status | OK or ERROR, with the HTTP status code your API returned. |
| Trigger | On Load when a widget ran as the conversation opened, or Manual when an agent ran it. |
| Method | The HTTP method. |
| URL | The address called, with the tokens filled in. |
| Details | Click View to see the request with its headers and the response your API returned. Secret header values are masked. |
To narrow the list, filter by Connector, URL, Trigger, or Date range, then click Search.
TIPWhen a widget shows nothing, check the request logs first. An ERROR status with a 401 or 403 code usually means a credential problem; a 404 usually means the address or a token value is wrong.
Deleting a connector
On the Data Connectors page, click Delete on the connector and confirm.
WARNINGBefore you delete a connector, check its card: it shows how many sidebar widgets are built on it. Those widgets get their data from this connector only.
To show a connector's data to agents, see the Sidebar Widgets page. For the rest of the manager options, see the Manager's Guide: Inbox Settings page.
Updated about 11 hours ago