Configuring SIP Accounts
Change your SIP account settings: reset password, modify username, increase channel limit, set Caller IDs, and change authentication type.
Your first SIP Account appears automatically after signing up for your CommPeak Portal account. Navigate to VoIP Services > SIP Accounts to configure it or add more SIP accounts.
The controls located in the cubes at the top of the SIP Accounts page let you:
- Add SIP accounts. By default, you can create up to 10 SIP accounts. If you require more, simply submit a request to our support team.
- Increase your channel limit as your usage grows.
- Adjust the rate cap to better manage your spending.
- Monitor the status of your default SIP server and view the full list of available CommPeak SIP server details.
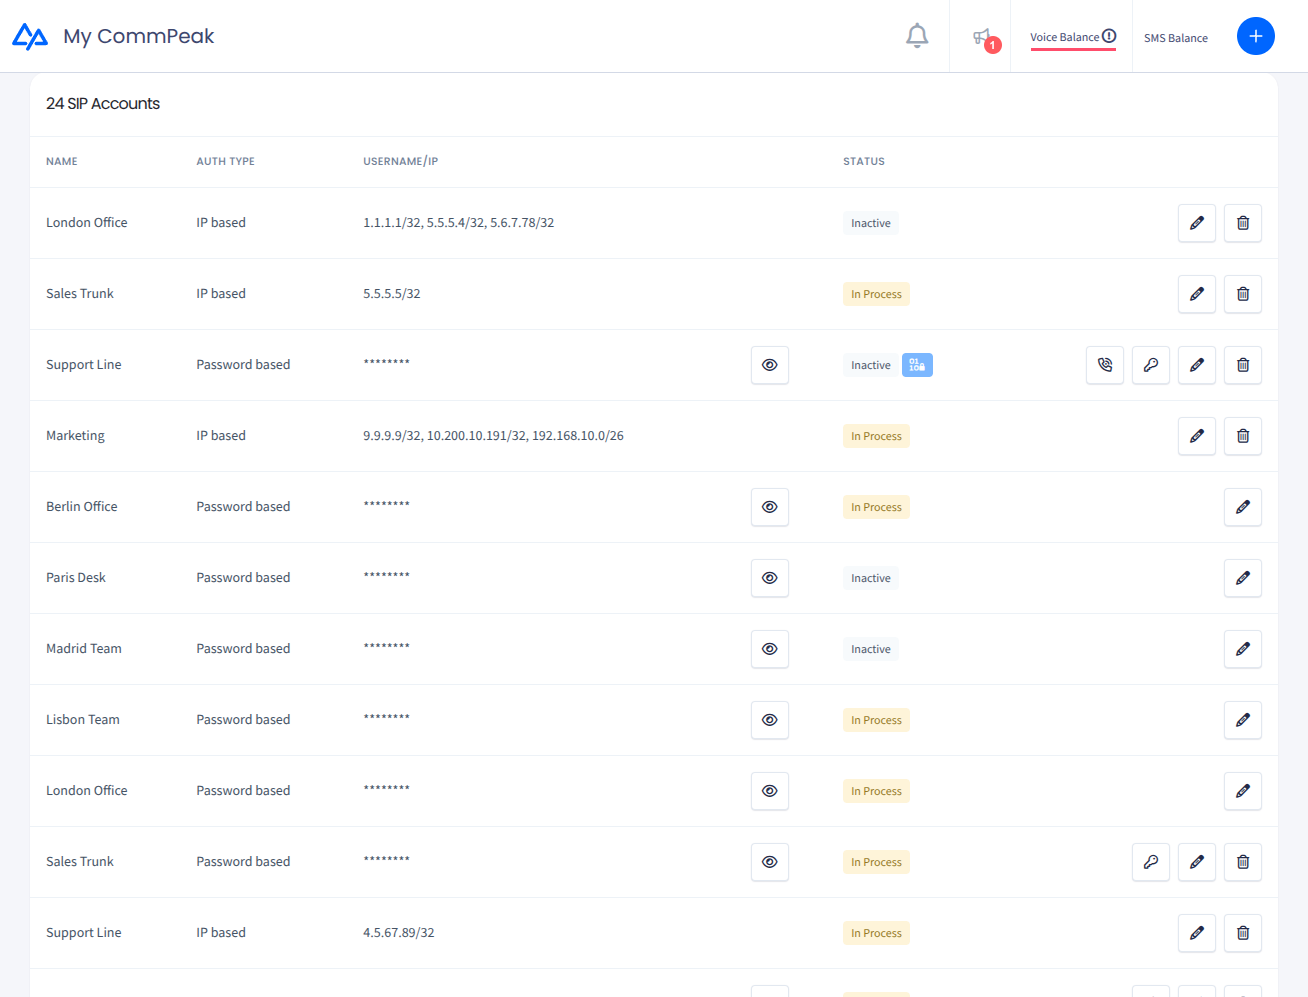
The table below explains each column in your SIP account settings.
| Column Title | Explanation |
|---|---|
| Name | The label you assign to identify your SIP account |
| Auth Type | Authentication type (password or IP-based) |
| Username/IP | The account username (click the eye icon to reveal it) or, for IP-based accounts, the allowed IP addresses |
| Status |
|
| Controls | Hover over each icon button to see its tooltip. You can perform the following actions:
|
The following sections explain how to adjust SIP account settings to suit your specific requirements.
Resetting Password or Changing Username
You need to reset the password or change the authentication username for your SIP account:
- to create a permanent password and username for your first SIP account
- after you switch from IP-based to password-based authentication
- when you forgot your current password.
To change the SIP account password or username:
-
Expand VoIP Services in the left pane.
-
Click the SIP Accounts tab.
-
On the SIP Accounts page, find the necessary account and click the Reset Password icon (the key icon - hover to see its tooltip):
SIP account data in CommPeak Portal
-
In the new window, click Send email.
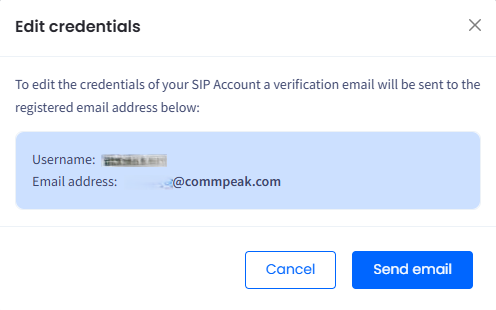
Editing SIP account credentials
- The system will send you a password change confirmation email. To confirm the change, click the Edit Credentials button from the email.
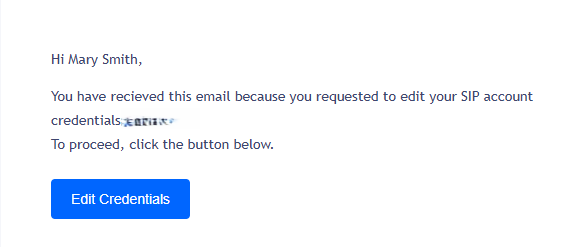
Email alert of editing SIP account credentials
- The SIP Accounts page opens with the Edit Credentials window. Enter the username and a new password (use the eye icon to reveal what you typed), then confirm the change by entering your CommPeak account password, and click Save changes.
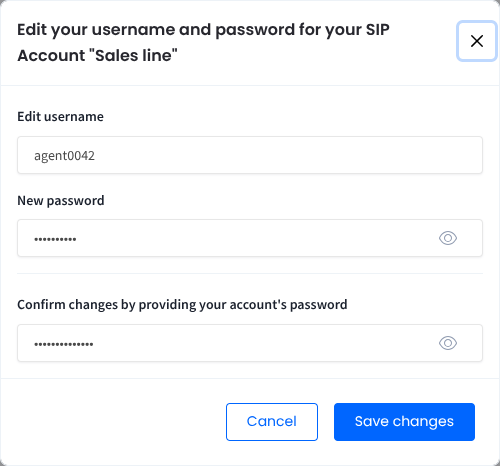
Setting a new SIP account username and password
Increasing Channel Limit
You get one channel for outbound calls after signup:
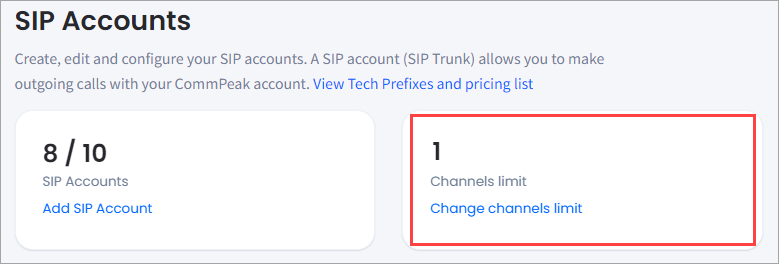
SIP Accounts page with channel limit
It is the limit for your entire account. The limit increases after your trial ends and you top up your account. If you need more channels, open a support ticket.
Setting the Caller ID
For your first SIP account, the default Caller ID is the phone number you verified while activating your trial account. You can view it in the Caller ID editing the SIP account:
- Expand VoIP Services in the left pane.
- Click the SIP Accounts tab.
- Click Edit for the SIP account you wish to modify.
- Go to the Caller ID panel.
Later, you can change your default Caller ID to a different number, set a name to be displayed instead, or create a set of Dynamic Caller IDs.
You can find detailed explanations and steps for creating and editing Caller ID rules in Dynamic Caller IDs article.
IMPORTANTChanging the Caller ID is not available for trial accounts. You are limited to the phone number you have used for CommPeak signup. To use other numbers for calling, please first top up your account.
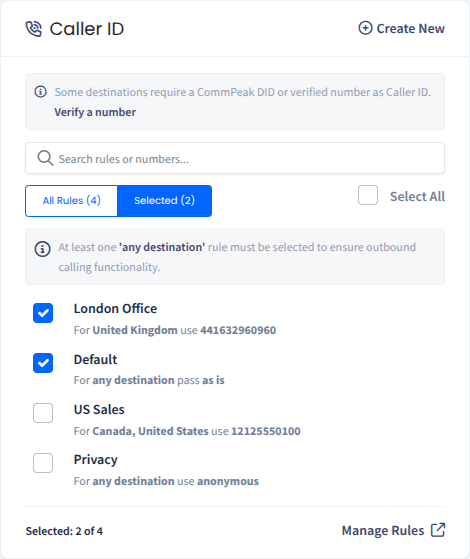
Caller ID settings in SIP accounts
In the Caller ID panel, you can:
- View the Caller ID rules available for this SIP account. Each rule is summarized as For <destination> use <Caller ID>.
- Activate or deactivate a rule by selecting or clearing its checkbox. Use Select All to toggle every rule at once; the Selected: X of Y counter shows how many are active.
- Find a rule quickly with the search box (by name, prefix, or number), or switch between the All Rules and Selected tabs.
- Create a new rule with the Create New link, or edit existing rules via the Manage Rules link.
Changing Authentication Settings
You can switch from the default password to IP-based authentication. For more information, see a separate article about SIP Account Authentication.
Updated 24 days ago