

AI Engines (Integrations)
Connect your Vapi or ElevenLabs account, create bot flows, and test them.
An AI engine is your connection to a voice-AI vendor. CommPeak connects to your vendor account - you keep control of the account, billing, and quotas. Once an engine is connected, you add one or more bot flows to it; each bot flow is a single bot with its own capacity and skills.
Open AI Engines from the main menu.
New to the feature?Start with the Voice AI Bot overview.
CommPeak supports two vendors today - Vapi and ElevenLabs. Pick yours below; each section is a complete, self-contained setup.
The Add a bot flow, test, and health steps further down are the same for every vendor.
Vapi
Prerequisites
Before you start in Vapi
- Create the assistant you want to use in your Vapi dashboard.
- Create a private (server-side) API key in Dashboard → Vapi API Keys, not the public key.
- The BYO SIP trunk is API-only on Vapi (no dashboard form). You'll provide gateway IPs and let CommPeak create the trunk for you (next section).
Connect the engine
-
On the AI Engines page (Settings > AI Engines), click Add AI Engine.
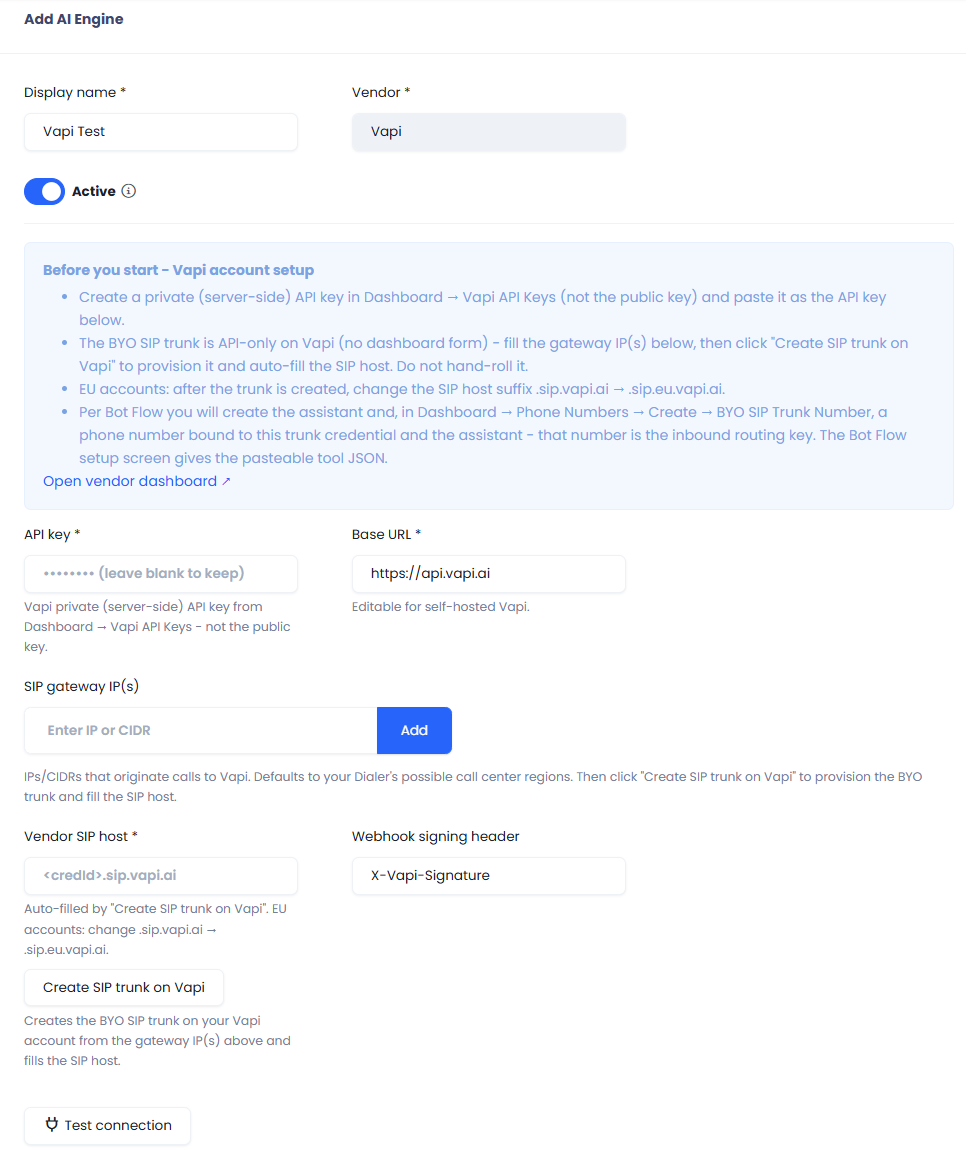
Adding new AI Engine - Vapi
-
Display name: a name for this connection (e.g.
Sales-Vapi-Acct-A). -
Vendor: choose Vapi. (Locked once saved - to switch vendor, create a new engine).
-
Provisioning:
- Auto - CommPeak pushes the trunk config to Vapi via API (recommended).
- Guided - you set up the trunk yourself.
-
Fill the credentials:
Field What to enter API key Your Vapi private (server-side) API key Base URL https://api.vapi.ai(change only for self-hosted Vapi)SIP gateway IP(s) IPs/CIDRs that originate calls to Vapi - defaults to CommPeak's FreeSWITCH IPs Vendor SIP host Filled automatically in the next step -
Click Create SIP trunk on Vapi. This provisions the BYO trunk from your gateway IPs and auto-fills Vendor SIP host.
-
(EU accounts only) Change the SIP host suffix
.sip.vapi.ai→.sip.eu.vapi.ai. -
Click Test connection, then Save Engine.
HMAC secretAfter saving, the engine shows an HMAC secret that signs the webhooks Vapi sends back to CommPeak. Use Show to reveal it, Regenerate to rotate it. If you regenerate, re-paste the new value into your Vapi webhook config or signing breaks.

Bot flow settings for Vapi
When you add a bot flow on a Vapi engine, these fields are Vapi-specific:
-
Vendor setup → Set it for me (recommended) - on save, CommPeak creates the transfer, hangup, and built-in End Call tools on your assistant, attaches them, appends CommPeak's tool-usage instructions to the assistant's system prompt, and creates & binds the BYO phone number. Your system prompt's qualifier logic is preserved.
-
SIP phone number - enter the E .164 number (e.g.
+19995550123) the bot answers on, and register that same number in Vapi → Phone Numbers → Create → BYO SIP Trunk Number, bound to your trunk credential and assistant.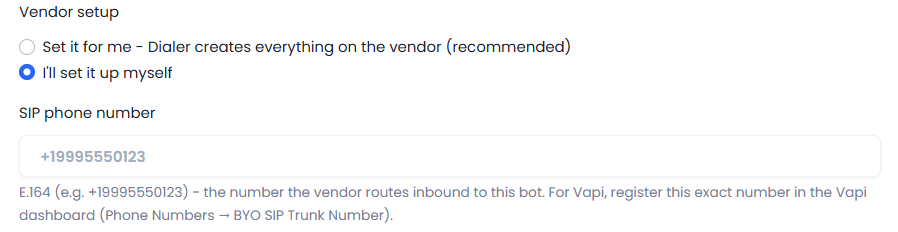
Vendor Setup and SIP Phone number
Manual setup guide (Vapi)
If you pick I'll set it up myself, the post-save screen walks you through these steps with the exact JSON to paste:
- Add the transfer to human tool (API Request → Edit as JSON).
- Add the hangup tool (API Request → Edit as JSON).
- Add the built-in End Call tool (this is what actually ends the call).
- Create the BYO SIP phone number and bind it to your assistant.
- Append the callback-clock + tool-usage rules to the assistant's system prompt.
You can reopen this any time from the Setup instructions action on the flow.
Call variables for your prompts (Vapi)
CommPeak sends per-call context on every call, and Vapi exposes each item as a dynamic variable you can reference in your assistant's system prompt (e.g. "Greet the lead by {{lead_first_name}}").
Available on every call (outbound and inbound):
| Variable | Content |
|---|---|
{{dialer_call_id}} | CommPeak's call ID - correlates with your CommPeak call records |
{{tenant_id}} | Your CommPeak account (tenant) ID |
{{lead_id}} | Lead ID |
{{lead_first_name}} | Lead first name |
{{lead_last_name}} | Lead last name |
{{lead_phone}} | Lead phone number |
{{campaign_id}} | Campaign ID |
{{campaign_name}} | Campaign name |
{{oi}} | The lead's original identifier (your CRM pointer) |
{{lead_local_time}} | The lead's current local time, YYYY-MM-DD HH:MM - anchor callbacks against this |
{{lead_timezone}} | The lead's timezone as a GMT label, e.g. GMT-5, GMT+5.5 |
Additionally on inbound calls (callers reaching the bot through an IVR - see Inbound Voice Agent):
| Variable | Content |
|---|---|
{{did}} | The number the caller dialed |
{{caller_number}} | The caller's number (caller ID) |
{{source}} | Always inbound |
{{lead_matched}} | true/false - whether the caller was matched to an existing lead |
Matched vs. unmatched inbound callersOn inbound calls where
{{lead_matched}}isfalse, the lead-context variables ({{lead_id}},{{lead_first_name}},{{lead_last_name}},{{lead_phone}},{{campaign_id}},{{campaign_name}},{{oi}}) are not sent at all - reference them only behind a "if the lead was matched" instruction in your prompt.
On outbound calls they are always sent, but a field that's empty on the lead arrives as an empty string.
ElevenLabs
Prerequisites
Before you start in ElevenLabs
- Create the agent you want to use in your ElevenLabs dashboard.
- Create an API key (
xi-api-key) in Developers → API Keys, scoped with ElevenAgents = Write, User = Access, Workspace = Write, Webhooks = Access (set everything else to No Access). Auto-setup uses this key to create the webhook secret, the transfer/hangup tools, and the SIP phone number.
Connect the engine
-
On the AI Engines page (Settings > AI Engines), click Add AI Engine.
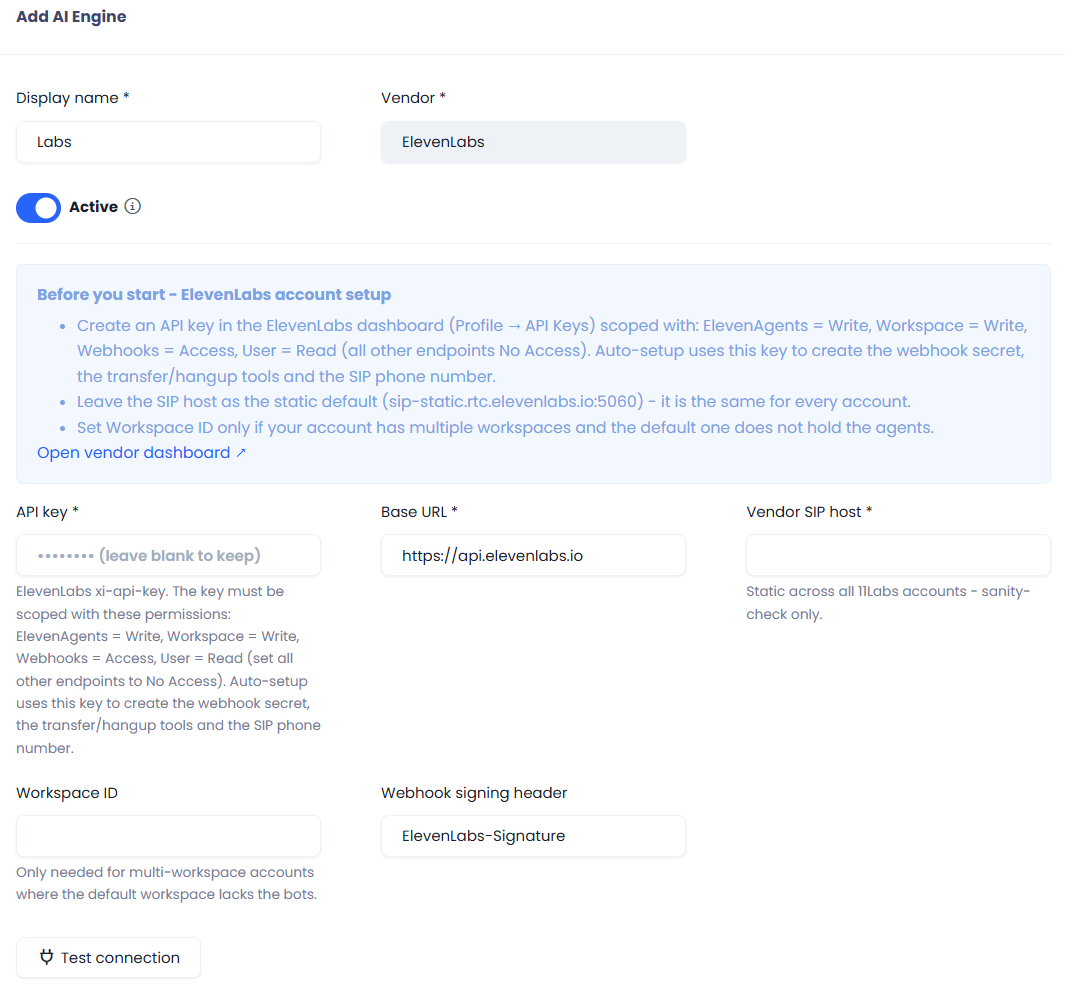
Adding a new AI Engine - ElevenLabs
-
Display name - a name for this connection (e.g.
Support-11Labs). -
Vendor - choose ElevenLabs. (Locked once saved). Provisioning is handled by ElevenLabs auto-setup, so that field is hidden.
-
Fill the credentials:
Field What to enter API key Your xi-api-keywith the permissions listed aboveBase URL https://api.elevenlabs.ioVendor SIP host Leave the prefilled value - it's the same for every ElevenLabs account (a sanity check only) Workspace ID Optional - only for multi-workspace accounts whose default workspace doesn't hold the agents -
Click Test connection, then Save Engine.
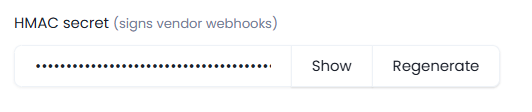
HMAC secretAfter saving, the engine shows an HMAC secret that signs the webhooks ElevenLabs sends back. Use Show/Regenerate; if you rotate it, re-paste it into your vendor webhook config.
Bot flow settings for ElevenLabs
When you add a bot flow on an ElevenLabs engine, these fields are ElevenLabs-specific:
-
Allowed IPs - IPs/CIDRs allowed to send inbound SIP to this bot's number; defaults to CommPeak's FreeSWITCH IPs.
-
SIP phone number - with Set it for me this is created and filled for you; in manual mode you enter it yourself.
-
Vendor setup → Set it for me (recommended) - on save, CommPeak creates the webhook secret, the transfer & hangup tools, and a SIP phone number, and writes the agent's conversation workflow. Your tuned qualifier prompt is kept.
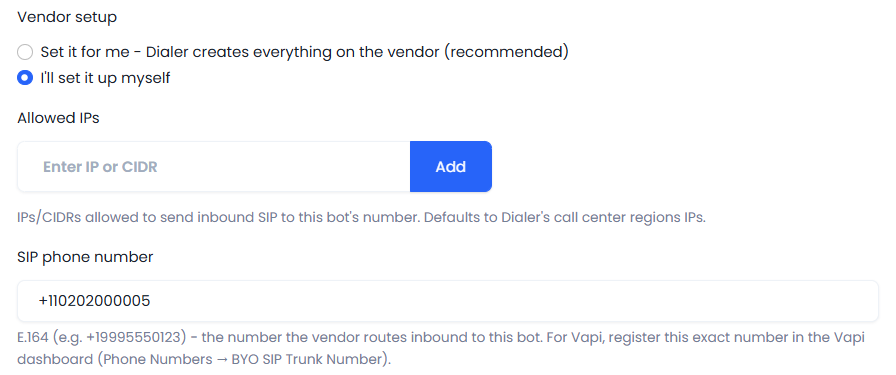
Manual setup guide (ElevenLabs)
If you pick I'll set it up myself, the post-save screen walks you through these steps with the exact values to paste:
- Create the webhook secret (Agents → Settings → Secrets).
- Create the transfer to human webhook tool (Edit as JSON), then add its Authorization header.
- Create the hangup webhook tool the same way.
- Import the SIP phone number (Phone Numbers → Import → SIP trunk) and set its Allowed addresses.
- Bind the number to your agent.
- Set the agent workflow (paste the workflow graph, swap in your two tool IDs).
- Append the callback clock to the agent's system prompt.
You can reopen this any time from the Setup instructions action on the flow.
Call variables for your prompts (ElevenLabs)
CommPeak sends per-call context on every call, and ElevenLabs exposes each item as a {{sip_*}} dynamic variable you can reference in your agent's system prompt (e.g. "Greet the lead by {{sip_lead_first_name}}").
Available on every call (outbound and inbound):
| Variable | Content |
|---|---|
{{sip_dialer_call_id}} | CommPeak's call ID - correlates with your CommPeak call records |
{{sip_tenant_id}} | Your CommPeak account (tenant) ID |
{{sip_lead_id}} | Lead ID |
{{sip_lead_first_name}} | Lead first name |
{{sip_lead_last_name}} | Lead last name |
{{sip_lead_phone}} | Lead phone number |
{{sip_campaign_id}} | Campaign ID |
{{sip_campaign_name}} | Campaign name |
{{sip_oi}} | The lead's original identifier (your CRM pointer) |
{{sip_lead_local_time}} | The lead's current local time, YYYY-MM-DD HH:MM - anchor callbacks against this |
{{sip_lead_timezone}} | The lead's timezone as a GMT label, e.g. GMT-5, GMT+5.5 |
Additionally on inbound calls (callers reaching the bot through an IVR - see Inbound Voice Agent):
| Variable | Content |
|---|---|
{{sip_did}} | The number the caller dialed |
{{sip_caller_number}} | The caller's number (caller ID) |
{{sip_source}} | Always inbound |
{{sip_lead_matched}} | true / false - whether the caller was matched to an existing lead |
Matched vs. unmatched inbound callersOn inbound calls where
{{sip_lead_matched}}isfalse, the lead-context variables ({{sip_lead_id}},{{sip_lead_first_name}},{{sip_lead_last_name}},{{sip_lead_phone}},{{sip_campaign_id}},{{sip_campaign_name}},
{{sip_oi}}) are not sent at all - reference them only behind a "if the lead was matched" instruction in your prompt.
On outbound calls they are always sent, but a field that's empty on the lead arrives as an empty string.
Add a bot flow
A bot flow maps one vendor bot into the dialer and decides how it runs. On the engine's row in the list, click Add Bot Flow. These fields are the same for every vendor (the vendor-specific fields are covered in your vendor section above):
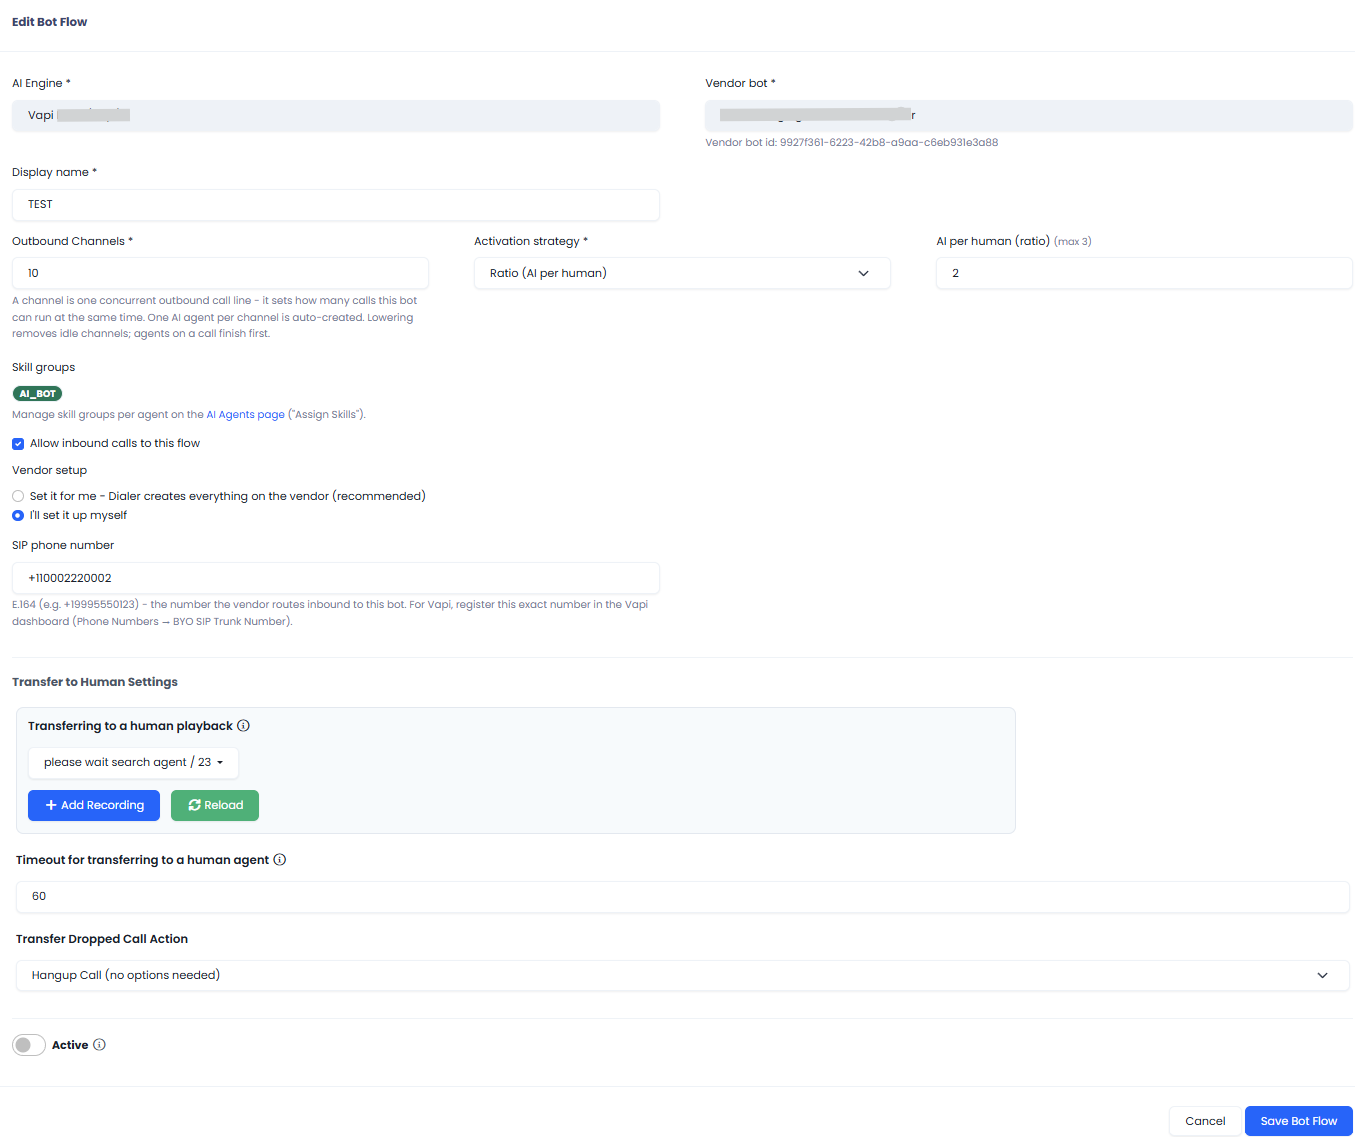
AI Bot Flow configuration
- AI Engine - the engine you're adding to (locked).
- Vendor bot - pick the bot to import from your vendor account. Bots already imported are hidden.
- Display name - a name for this flow inside the dialer.
- Channels - how many calls this bot handles at once. The dialer creates one AI agent per channel automatically. Lowering the number removes idle channels; agents on a call finish first. (Capped by the vendor's per-bot limit, shown as a hint.)
- Activation strategy - how many of the flow's AI Agents stay active:
- Ratio (AI per human) - a target number of bots per active human (e.g.
3.0). Scales with your human staffing. - Fixed active count - a set number of bots, regardless of humans. (Available only if your account allows it.)
- Ratio (AI per human) - a target number of bots per active human (e.g.
- Skill groups - the skill groups all channels of this flow share. This is how the flow reaches campaigns - see How a bot reaches a campaign in the overview article.
- Allow inbound calls - check to let this flow accept inbound callers from an IVR. See Inbound Voice Agent.
- Vendor setup + any vendor-specific fields - see your vendor section above.
- Transfer to Human Settings - what happens when the bot hands a call to a live agent:
- Transferring to a human playback: the recording the lead hears while we connect them to an agent. If left empty, we play a ringback tone instead.
- Timeout for transferring to a human agent: seconds to wait for an agent before giving up (Default 60 sec).
- Transfer Dropped Call Action: what to do if no agent answers (Hangup/ Play file/ Forward).
- Leave Active checked and click Save Bot Flow.
Manage engines and flows
The AI Engines page lists each engine with an expand arrow that reveals its bot flows.
Engine columns: Active (accepting traffic) and Status: Healthy, or Auto-disabled with a hover reason. Engine actions: Add Bot Flow, Edit, Re-enable (when auto-disabled), Delete.

Bot flow columns: Channels, Activation (ratio/fixed), Active, and Status. Flow actions: Setup instructions, Test Bot Flow, Edit, Re-enable (when auto-disabled), Delete.

Test bot flow
Use Test Bot Flow to place a real test call and confirm the bot answers and greets correctly. Choose where the test call rings first:
- My SIP URI: your own logged-in SIP device.
- Destination Number (Via Trunks): any phone number, dialed over your trunks.
On answer, the call is connected to the bot. The test call is not saved to your call records.
Your vendor charges for test callsA test call runs through your vendor account just like a live call, so vendor usage charges apply.
Vendor health & auto-disable
If calls to a vendor keep failing, CommPeak automatically protects you: the affected bot flow is set to Auto-disabled (and a widespread failure cascades to the whole engine), with a reason you can read by hovering the status icon.
You're notified when this happens. Once the vendor is healthy again, click Re-enable on the flow or engine to resume.
✔️ With an engine connected and a bot flow active, your bots are ready to dial - head to AI Agents to clock them in.
Updated 3 days ago