For AI agents: visit https://docs.commpeak.com/llms.txt for an index of all pages formatted in Markdown and endpoints in OpenAPI. Append .md to any documentation page URL to get its markdown version.
Open a channel type, read the channel list, and manage one channel: its token, its test send, its details, and the actions that pause or remove it.
Channels is the TextPeak page where every messaging route lives, grouped under the type it belongs to. This page covers what the Channels page does day to day: opening a type, reading the channel list, and managing a single channel.
Channels is the new name for Streams API, introduced in TextPeak v1.1.2. The routes themselves have not changed: your existing streams appear here as channels, and every token, template, and webhook continues to work. Only the page and its navigation have been rebuilt.
The Channels page opens and lists every channel type, with the number of channels you have created under each one.
The Channels page in TextPeak
What you can do with Channels
Group routes by type so you open WhatsApp, Email, or WebChat and see only the channels that belong to it.
Create a channel through a form that names the route first and collects its type-specific settings after. The number of steps depends on its type.
Manage a channel in one place, including its token, its details, its type settings, and its message templates.
Check channel status at a glance, so you can tell which routes are ready, which are still drafts, and when each last carried traffic.
Working with a single channel type
Opening a type card takes you to that type's page, which holds a short description of the type, a Read the docs link, and the list of channels you have created for this particular type.
A channel type page, with its channel list and the Add channel button
Most types share the same columns, and the fourth column changes with the type. The exact set varies by channel type: WebChat lists domains and a widget key, SMS Marketing, SMS Transactional/OTP channels, and SMS Two-way channels list route IPs, while Voice lists Caller ID.
The table below is the WhatsApp set:
Column
Description
Name
The channel name you entered when you created it.
Status
Ready for an active channel, Draft for one that has not been activated yet.
Tags
Any tags applied to the channel.
Sender Numbers
The numbers the channel sends from. On other types this column is Route IPs, Domains, Caller Id, or Bots.
Default sender
The sender used when a request does not name one.
Last activity
When the channel last carried traffic.
📘
NOTE
WebChat is the exception: its list has no Status, Tags, Default sender, or Last activity columns, and shows Name, Domains, Widget key, and Created instead.
A channel type page, with its channel list and the Add channel button
Select the channel on the list to open the Manage channel page.
Managing a channel
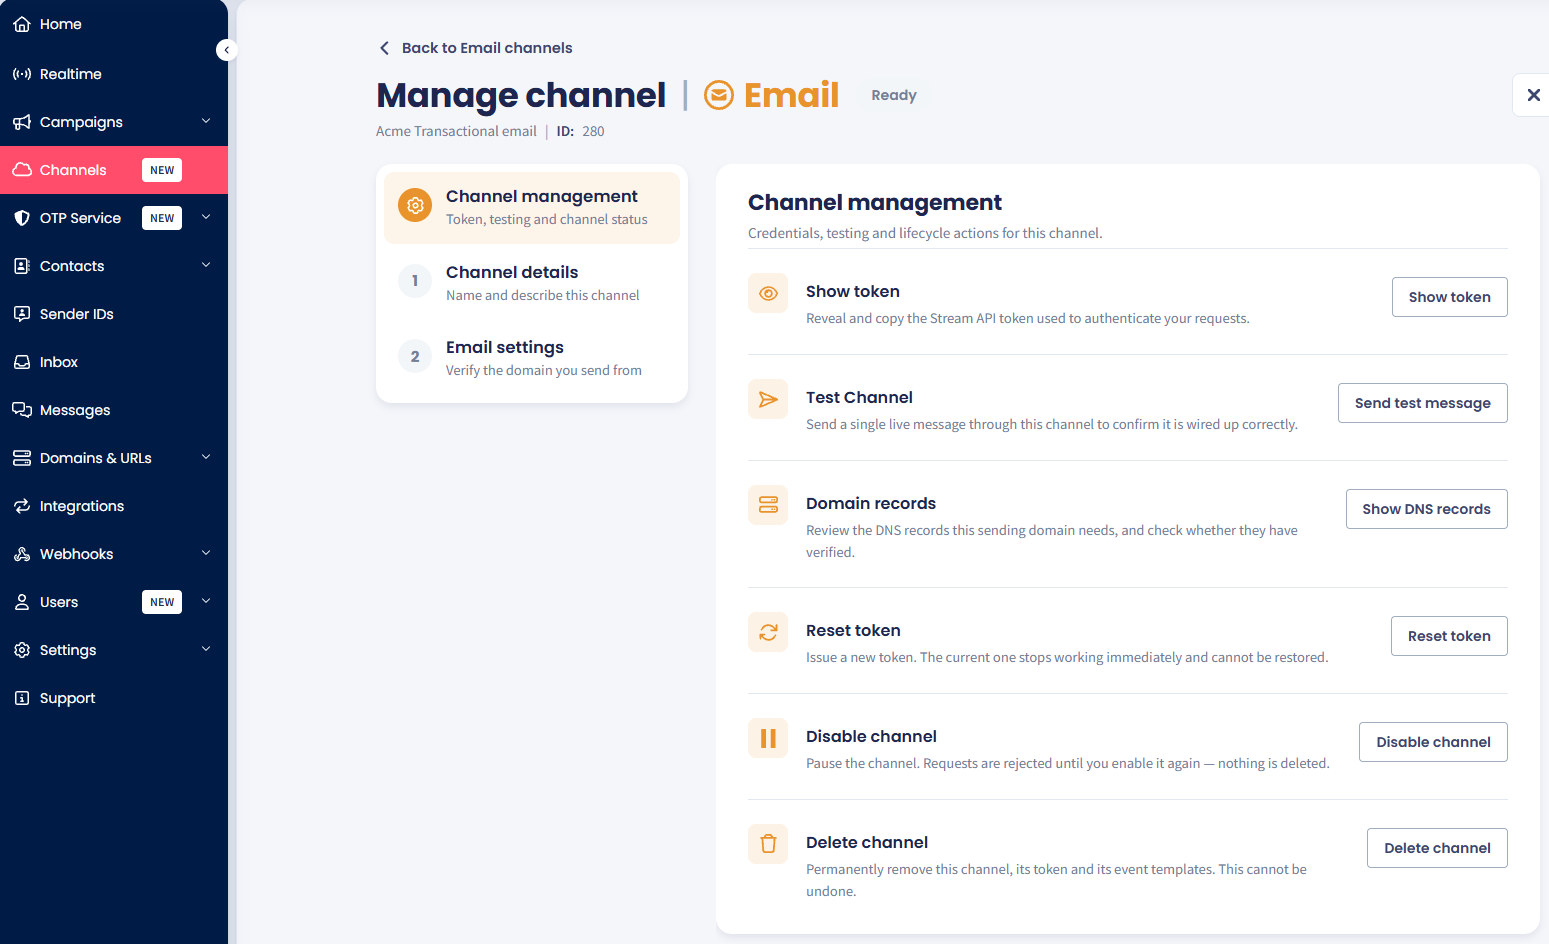
The Manage channel page holds everything for one channel. Its left panel lists the sections, and the panel on the right scrolls through them.
Manage channel, open on Channel management
This section holds the credentials, the test action, and the lifecycle actions depending on the channel type.
Action
What it does
Show token
Reveals the Stream API token that authenticates your requests, so you can copy it.
Test Channel
Sends a single live message through the channel to confirm it is wired up correctly.
Domain records
For Email channel records, click on it opens the sidebar with the review of the DNS records this sending domain needs, so you can check whether they have verified.
Reset token
Issues a new token. The current one stops working straight away and cannot be restored.
Disable channel
Pauses the channel. Requests are rejected until you enable it again, and nothing is deleted.
Delete channel
Removes the channel, its token, and its event templates. This cannot be undone.
🚧
WARNING
Reset token and Delete channel take effect at once and cannot be reversed. Update every integration that uses the current token before you reset it.
IMPORTANT
Email channels add one more action, Domain records, which opens the DNS records the sending domain needs and shows whether they have verified. For details, see Creating Email Channels.
Channel details
Holds the channel name, its description, its IP restriction, and its tags. Click Save/Edit details to save or change them.
Channel details section: updating channel details
Type settings
Types that have settings of their own get a second numbered section, named after the type. For example, WhatsApp channels ask for the auth token and business ID of the WhatsApp Business account, WebChat channels hold the widget configuration, and Email channels hold the sending domain and its addresses.
The type settings section, here WhatsApp settings
Channel message content
Lists the event templates the channel can send, with the approval status, the category, and the language of each one. Click New event template to add one, or use the pencil and bin icons to edit or remove an existing template.
Channel message content, listing the channel's event templates
Creating a channel
Every type starts with the same Channel details step. How many steps follow it depends on the type.
Channel type
Steps
SMS Marketing, SMS Two-way, WhatsApp Private
One step, Channel details, ending in Save & activate.
Two steps: Channel details, then that type's own settings.
WebChat
Four steps: Widget details, Content, Appearance, and Placement, ending in Create widget.
To create a channel:
Open the type you want, then click Add channel.
On the Channel details step, enter a Channel name and a Channel description.
Set Enable IP ACL if you want to restrict which addresses may call the channel, and add any Tags, if needed.
Select Use Demo Sending to simulate delivery without sending real messages.
For a one-step type, click Save & activate. For a type with more steps, click Next, complete the remaining steps, then click Save & activate on the last one.
The Channel details step of adding a new WhatsApp channel
❗️
IMPORTANT
Saving activates the channel straight away and it starts accepting traffic. You can pause or edit it at any time from Manage channel.